
.NET 7.0 + Dapper + PostgreSQL - CRUD API Tutorial in ASP.NET Core
Built with .NET 7.0, Dapper 2.0 and PostgreSQL
In this tutorial we'll show how to build a .NET 7.0 (ASP.NET Core) API with Dapper and PostgreSQL that supports CRUD operations.
Tutorial contents
- Example API overview
- Tools required to run the .NET 7.0 API
- Run the CRUD example API locally
- Test the API with Postman
- Connect an Angular app with the .NET API
- Connect a React app with the .NET API
- .NET 7.0 code documentation
- Other versions of this tutorial
Example .NET 7.0 + Dapper API Overview
The example ASP.NET Core API includes routes to retrieve, update, create and delete records in the database, the records in the example app are for users but this is only for demonstration purposes, the same CRUD pattern and code structure could be used to manage any type of data e.g. products, services, articles etc.
Dapper ORM (Object Relational Mapper)
The API uses Dapper to access and manage data in the database. Dapper is a micro ORM that supports executing raw SQL queries and mapping results to C# objects and collections, it's implemented as a collection of extension methods on top of the ADO.NET IDbConnection interface.
Dapper doesn't support all of the functionality of full ORMs such as Entity Framework Core (e.g. SQL generation, caching, database migrations etc) but instead is focused on performance and is known for being lightweight and fast.
PostgreSQL Database
PostgreSQL (also known as Postgres) is the database used by the ASP.NET Core API, a free and open-source full featured relational database, it's a good option for any size application in production or development. The ADO.NET provider for Postgres (Npgsql) is used to connect to the database.
Code on GitHub
The tutorial project is available on GitHub at https://github.com/cornflourblue/dotnet-7-dapper-postgres-crud-api.
Tools required to run the .NET 7.0 Tutorial API Locally
To follow the steps in this tutorial you'll need the following:
- .NET SDK - includes the .NET runtime and command line tools
- Visual Studio Code - code editor that runs on Windows, Mac and Linux
- C# extension for Visual Studio Code - adds support to VS Code for developing .NET applications
- PostgreSQL - you'll need access to a running PostgreSQL server instance for the API to connect to, it can be remote (e.g. Azure, AWS etc) or on your local machine. The PostgreSQL downloads page is at https://www.postgresql.org/download/, ensure it is started so the API can connect to it. You can also run it in a Docker container, the official docker images for Postgres are available at https://hub.docker.com/_/postgres.
Run the .NET 7.0 CRUD Example API Locally
- Download or clone the tutorial project code from https://github.com/cornflourblue/dotnet-7-dapper-postgres-crud-api
- Update the database credentials in
/appsettings.jsonto connect to your PostgreSQL instance, and ensure Postgres is running. - Start the API by running
dotnet runfrom the command line in the project root folder (where the WebApi.csproj file is located), you should see the messageNow listening on: http://localhost:4000. - Follow the instructions below to test with Postman or hook up with one of the example single page applications available (Angular or React).
PostgreSQL database creation
A new Postgres database (dotnet-7-dapper-crud-api) is created with all required tables by the data context class the first time the API is started.
Start VS Code in debug mode
You can also start the application in debug mode in VS Code by opening the project root folder in VS Code and pressing F5 or by selecting Debug -> Start Debugging from the top menu, running in debug mode allows you to attach breakpoints to pause execution and step through the application code. For detailed instructions including a short demo video see VS Code + .NET - Debug a .NET Web App in Visual Studio Code.
Test the .NET 7.0 CRUD API with Postman
Postman is a great tool for testing APIs, you can download it for free at https://www.postman.com/downloads.
Below are instructions on how to use Postman to perform the following actions:
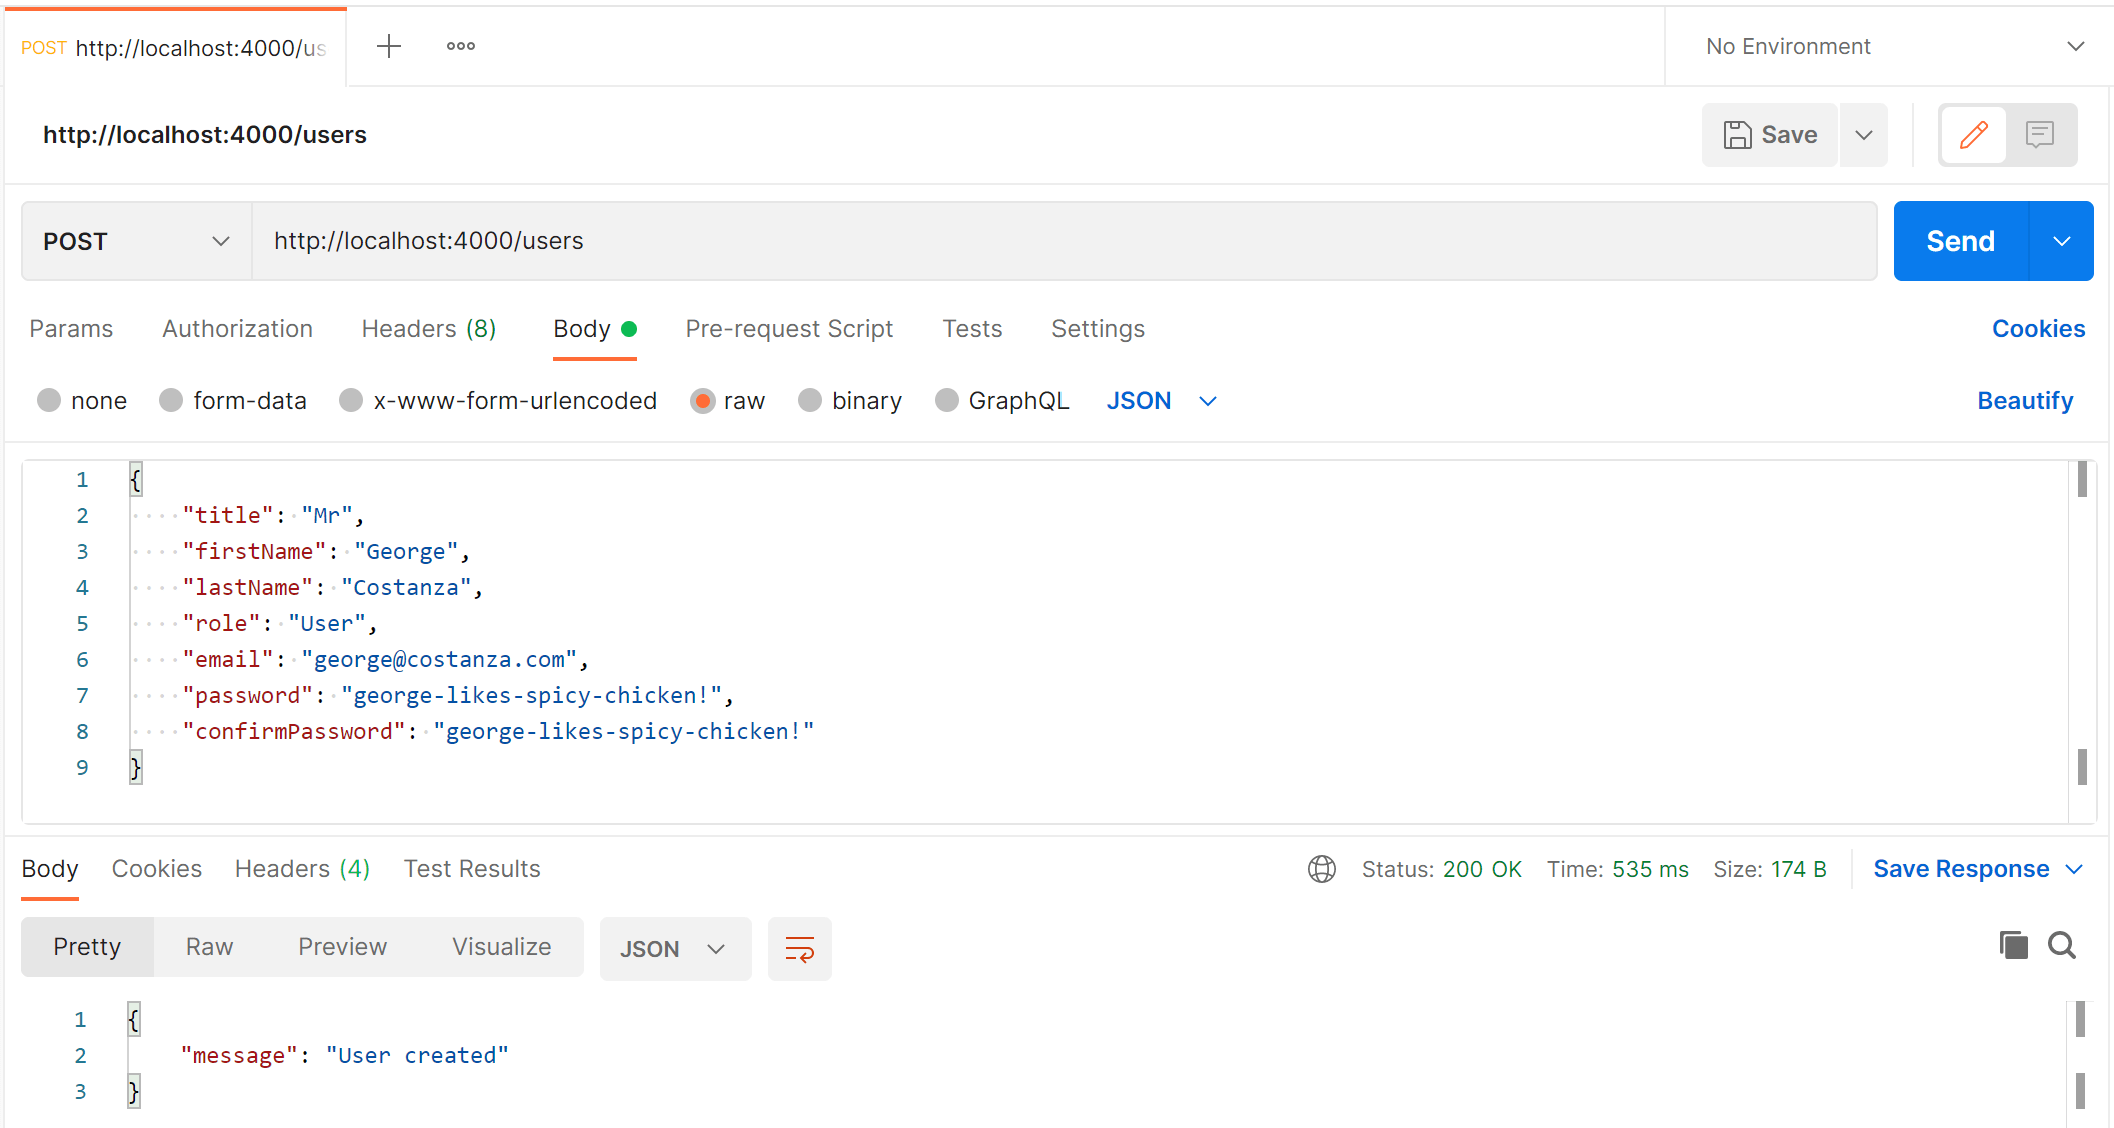
How to create a new user with Postman
To create a new user with the CRUD API follow these steps:
- Open a new request tab by clicking the plus (+) button at the end of the tabs.
- Change the HTTP method to POST with the dropdown selector on the left of the URL input field.
- In the URL field enter the address to the users route of your local API -
http://localhost:4000/users - Select the Body tab below the URL field, change the body type radio button to raw, and change the format dropdown selector to JSON.
- Enter a JSON object containing the required user properties in the Body textarea, e.g:
{ "title": "Mr", "firstName": "George", "lastName": "Costanza", "role": "User", "email": "[email protected]", "password": "george-likes-spicy-chicken", "confirmPassword": "george-likes-spicy-chicken" } - Click the Send button, you should receive a "200 OK" response with the message "User created" in the response body.
Here's a screenshot of Postman after the request is sent and the user has been created:
How to retrieve a list of all users with Postman
To get a list of all users from the .NET 7 CRUD API follow these steps:
- Open a new request tab by clicking the plus (+) button at the end of the tabs.
- Change the HTTP method to GET with the dropdown selector on the left of the URL input field.
- In the URL field enter the address to the users route of your local API -
http://localhost:4000/users - Click the Send button, you should receive a "200 OK" response containing a JSON array with all of the user records in the system.
Here's a screenshot of Postman after making a request to get all users:

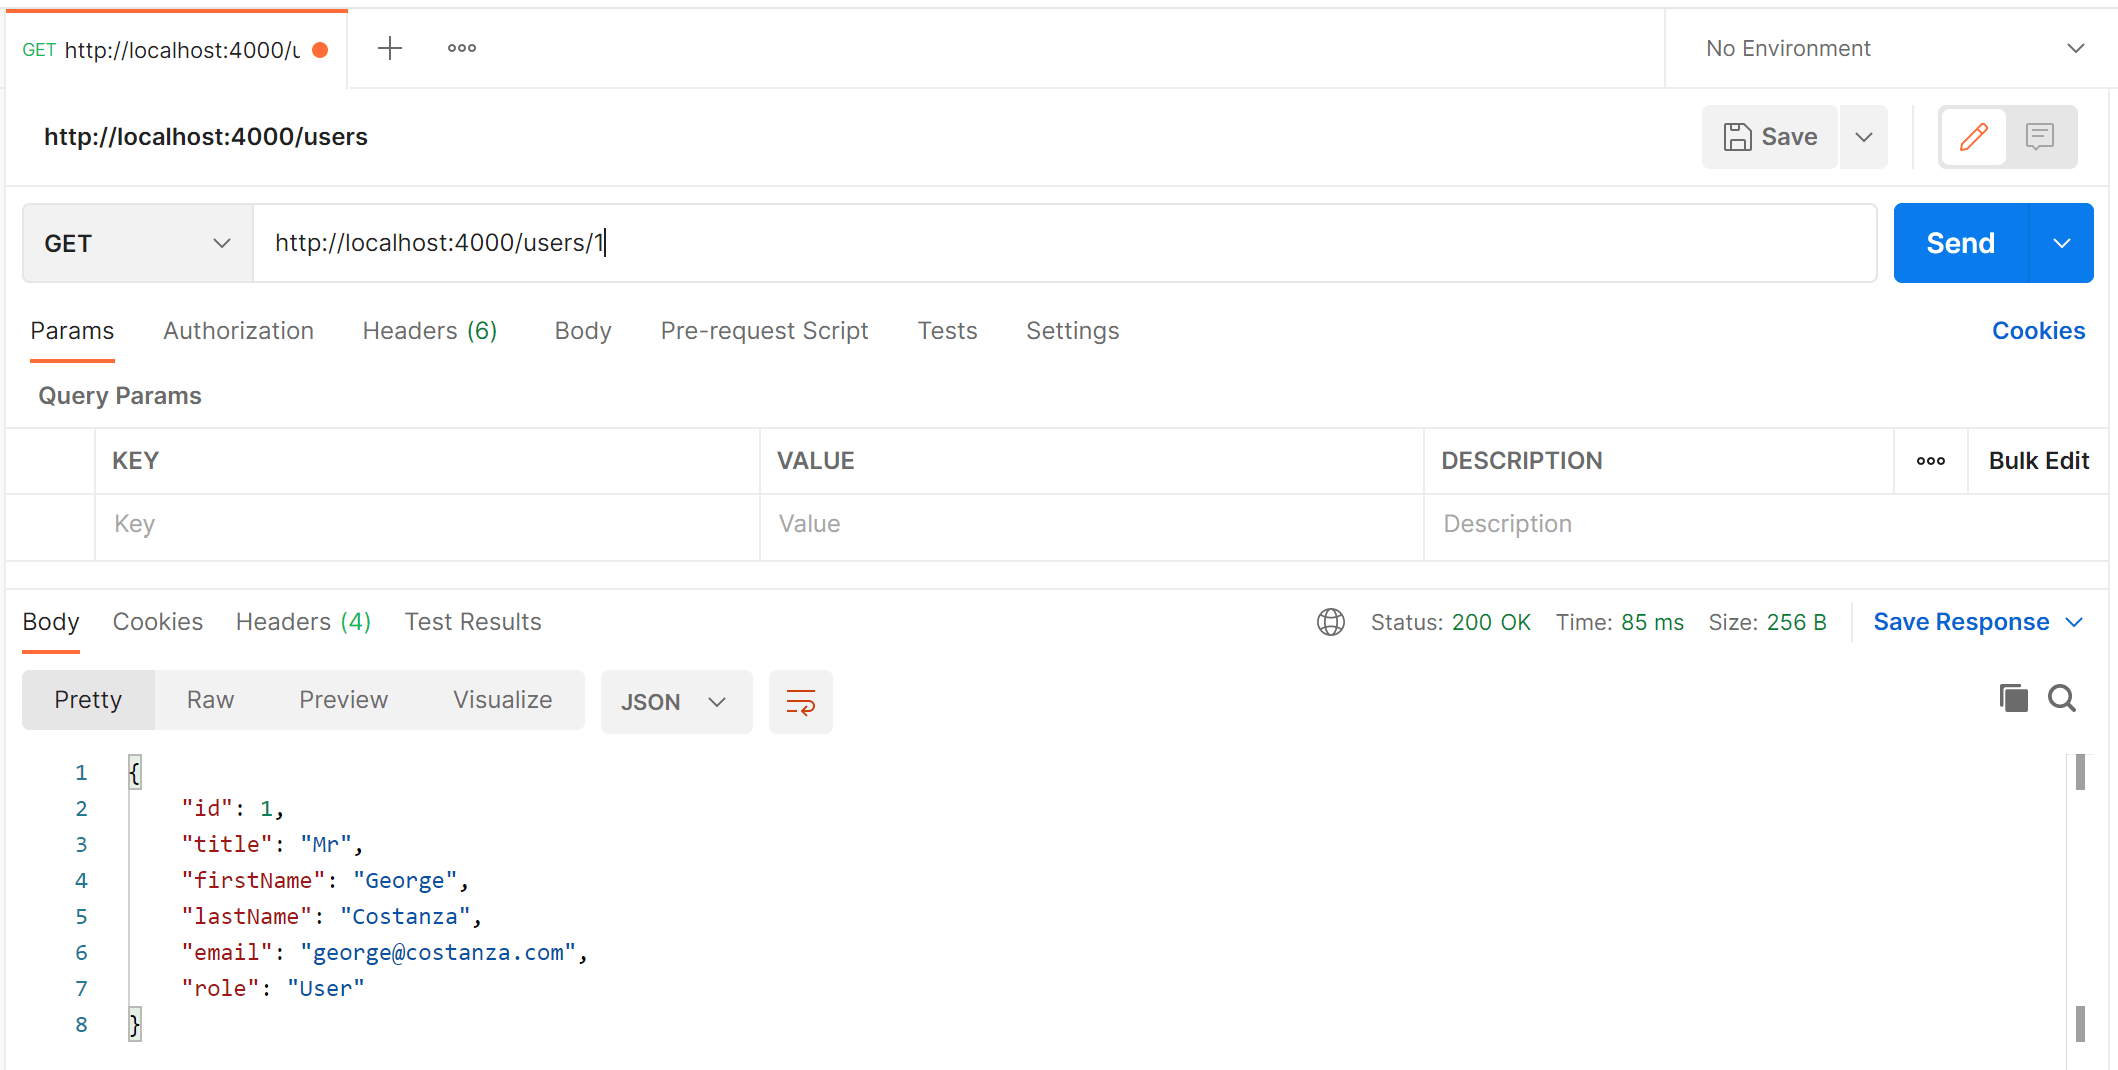
How to retrieve a user by id with Postman
To get a specific user by id from the .NET 7 CRUD API follow these steps:
- Open a new request tab by clicking the plus (+) button at the end of the tabs.
- Change the HTTP method to GET with the dropdown selector on the left of the URL input field.
- In the URL field enter the address to the
/users/{id}route with the id of the user you want to retrieve, e.g -http://localhost:4000/users/1 - Click the Send button, you should receive a "200 OK" response containing a JSON object with the specified user details.
Here's a screenshot of Postman after making a request to get a user by id:
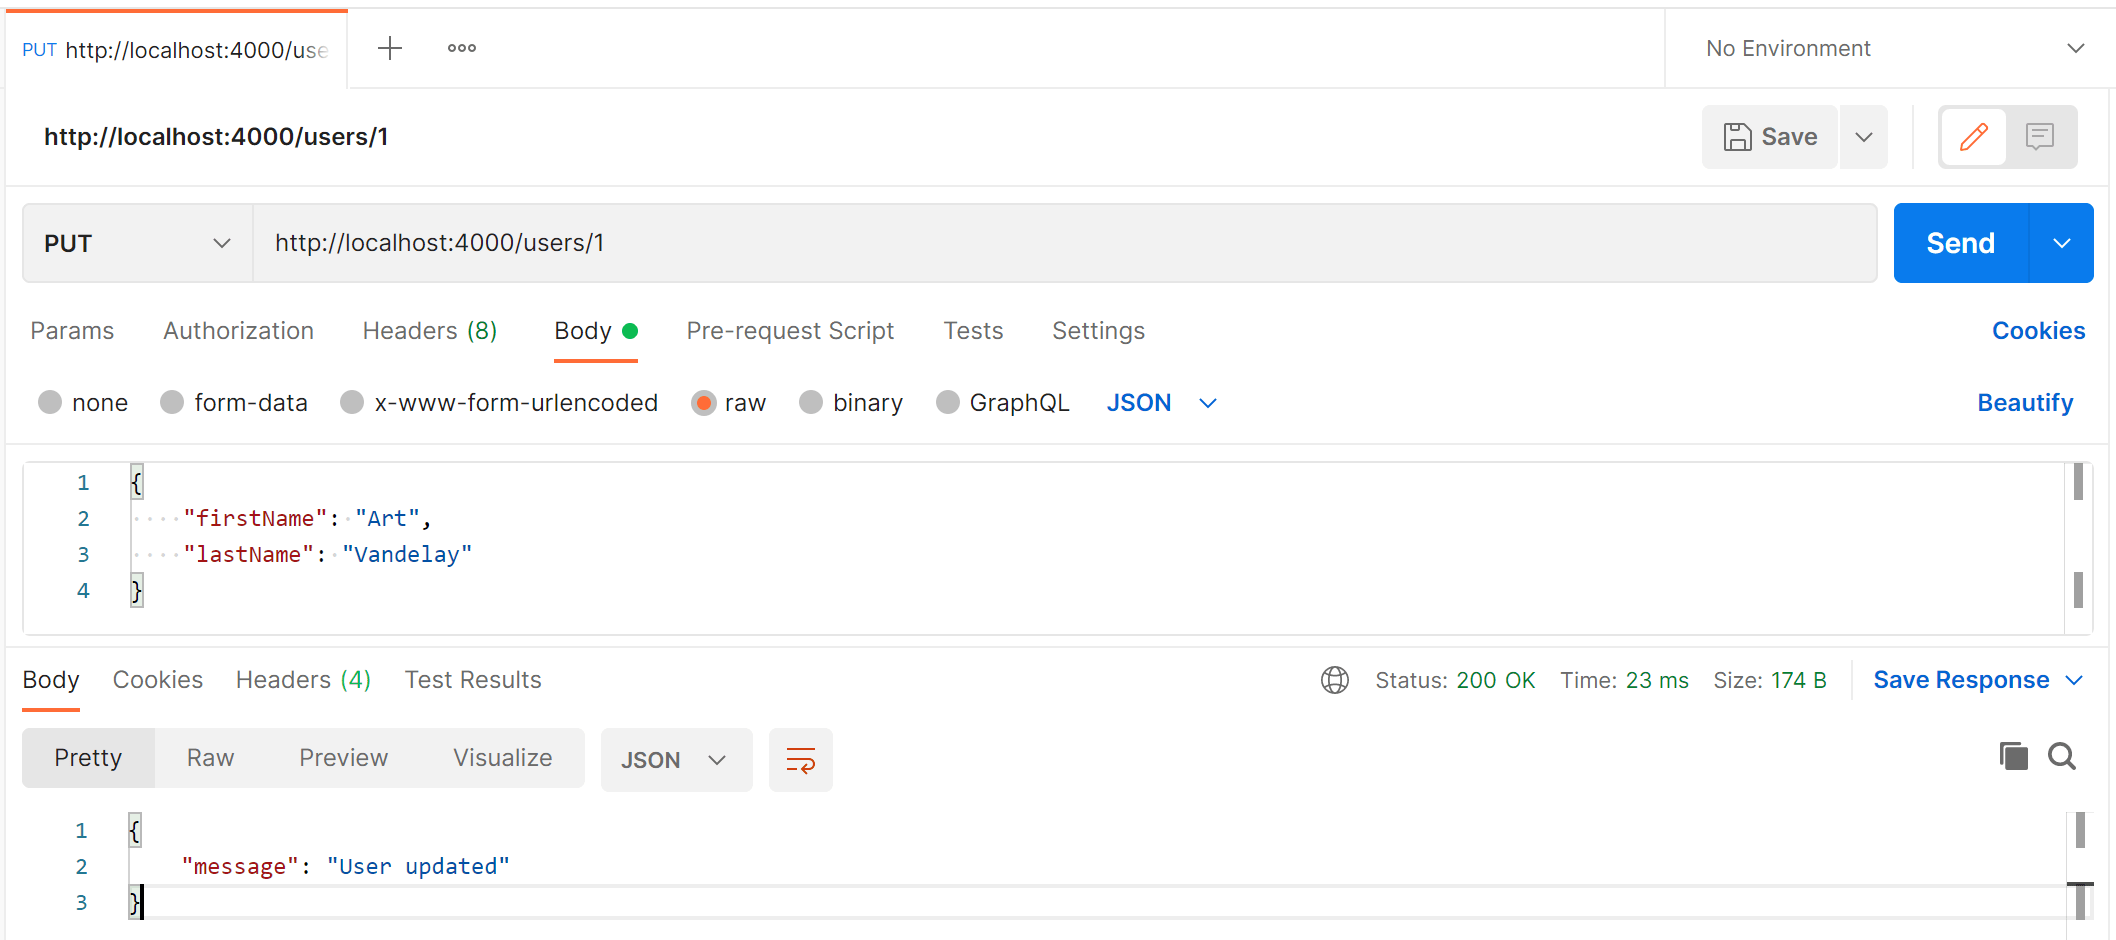
How to update a user with Postman
To update a user with the CRUD API follow these steps:
- Open a new request tab by clicking the plus (+) button at the end of the tabs.
- Change the HTTP method to PUT with the dropdown selector on the left of the URL input field.
- In the URL field enter the address to the
/users/{id}route with the id of the user you want to update, e.g -http://localhost:4000/users/1 - Select the Body tab below the URL field, change the body type radio button to raw, and change the format dropdown selector to JSON.
- Enter a JSON object in the Body textarea containing the properties you want to update, for example to update the first and last names:
{ "firstName": "Art", "lastName": "Vandelay" } - Click the Send button, you should receive a "200 OK" response with the message "User updated" in the response body.
Here's a screenshot of Postman after the request is sent and the user has been updated:
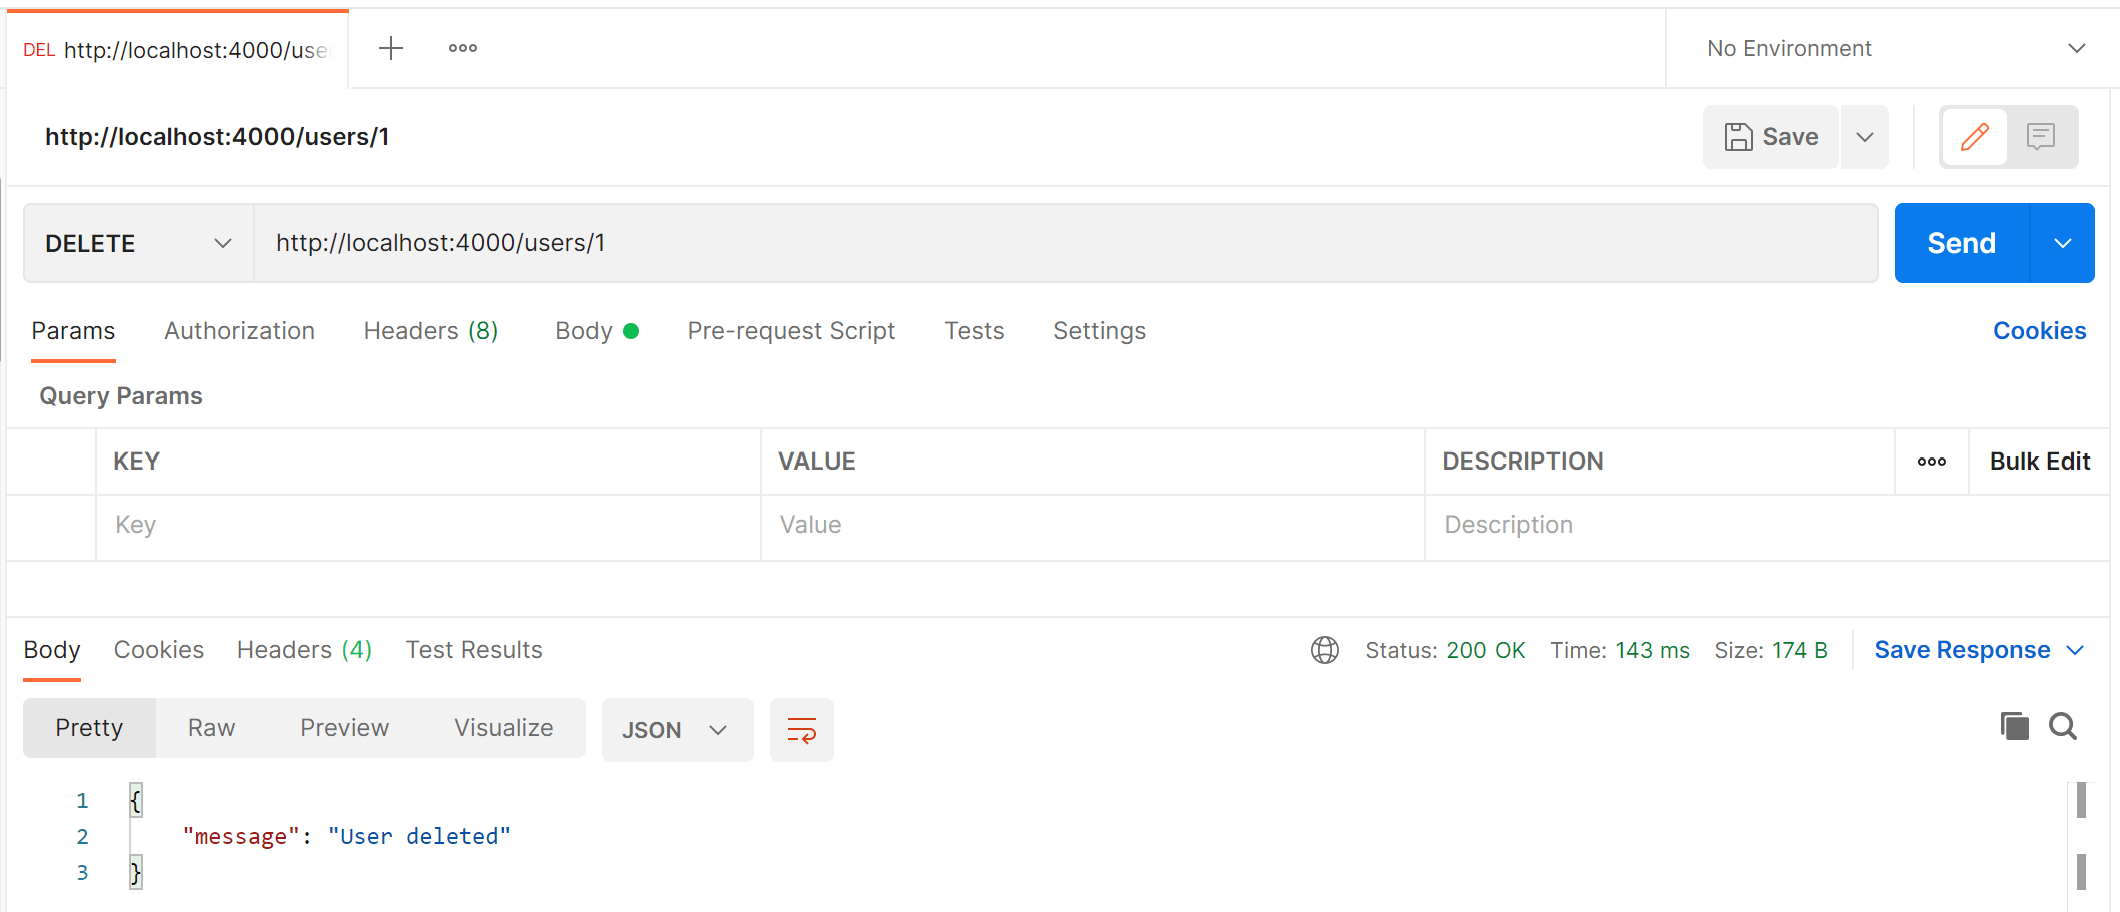
How to delete a user with Postman
To delete a user with the API follow these steps:
- Open a new request tab by clicking the plus (+) button at the end of the tabs.
- Change the HTTP method to DELETE with the dropdown selector on the left of the URL input field.
- In the URL field enter the address to the
/users/{id}route with the id of the user you want to delete, e.g -http://localhost:4000/users/1 - Click the Send button, you should receive a "200 OK" response with the message "User deleted" in the response body.
Here's a screenshot of Postman after the request is sent and the user has been deleted:
Connect an Angular App with the .NET CRUD API
For full details about the Angular CRUD app see the post Angular 14 - CRUD Example with Reactive Forms. But to get up and running quickly just follow the below steps.
- Install Node.js and npm from https://nodejs.org.
- Download or clone the Angular tutorial code from https://github.com/cornflourblue/angular-14-crud-example
- Install all required npm packages by running
npm installfrom the command line in the project root folder (where the package.json is located). - Remove or comment out the line below the comment
// provider used to create fake backendlocated in the/src/app/app.module.tsfile. - Start the application by running
npm startfrom the command line in the project root folder, this will launch a browser displaying the application and it should be hooked up with the .NET 7 + Dapper CRUD API that you already have running.
Connect a React App with the .NET CRUD API
For full details about the React CRUD app see the post React - CRUD Example with React Hook Form. But to get up and running quickly just follow the below steps.
- Install Node.js and npm from https://nodejs.org.
- Download or clone the React tutorial code from https://github.com/cornflourblue/react-hook-form-crud-example
- Install all required npm packages by running
npm installornpm ifrom the command line in the project root folder (where the package.json is located). - Remove or comment out the 2 lines below the comment
// setup fake backendlocated in the/src/index.jsxfile. - Start the application by running
npm startfrom the command line in the project root folder, this will launch a browser displaying the application and it should be hooked up with the .NET 7 + Dapper CRUD API.
.NET 7.0 + Dapper API Code Documentation
The .NET + Dapper tutorial project is organised into the following folders:
Controllers
Define the end points / routes for the web api, controllers are the entry point into the web api from client applications via http requests.
Models
Represent request and response models for controller methods, request models define parameters for incoming requests and response models define custom data returned in responses when required. The example only contains request models because it doesn't contain any routes that require custom response models, entities are returned directly by the user GET routes.
Services
Contain business logic and validation code, services are the interface between controllers and repositories for performing actions or retrieving data.
Repositories
Contain database access code and SQL queries.
Entities
Represent the application data that is stored in the database.
Dapper maps relational data from the database to instances of C# entity objects to be used within the application for data management and CRUD operations.
Helpers
Anything that doesn't fit into the above folders.
Click any of the below links to jump down to a description of each file along with its code:
- Controllers
- Entities
- Helpers
- Models
- Repositories
- Services
- appsettings.json
- Program.cs
- WebApi.csproj
.NET Users Controller
The ASP.NET Core users controller defines and handles all routes / endpoints for the api that relate to users, this includes standard CRUD operations for retrieving, updating, creating and deleting users. Within each route the controller calls the user service to perform the action required, this enables the controller to stay 'lean' and completely separate from the business logic and data access code.
namespace WebApi.Controllers;

using Microsoft.AspNetCore.Mvc;
using WebApi.Models.Users;
using WebApi.Services;

[ApiController]
[Route("[controller]")]
public class UsersController : ControllerBase
{
    private IUserService _userService;

    public UsersController(IUserService userService)
    {
        _userService = userService;
    }

    [HttpGet]
    public async Task<IActionResult> GetAll()
    {
        var users = await _userService.GetAll();
        return Ok(users);
    }

    [HttpGet("{id}")]
    public async Task<IActionResult> GetById(int id)
    {
        var user = await _userService.GetById(id);
        return Ok(user);
    }

    [HttpPost]
    public async Task<IActionResult> Create(CreateRequest model)
    {
        await _userService.Create(model);
        return Ok(new { message = "User created" });
    }

    [HttpPut("{id}")]
    public async Task<IActionResult> Update(int id, UpdateRequest model)
    {
        await _userService.Update(id, model);
        return Ok(new { message = "User updated" });
    }

    [HttpDelete("{id}")]
    public async Task<IActionResult> Delete(int id)
    {
        await _userService.Delete(id);
        return Ok(new { message = "User deleted" });
    }
}
Role Enum
The role enum defines all the available roles in the example api. I created it to make roles strongly typed and avoid passing them around as strings, so instead of 'Admin' we can use Role.Admin.
namespace WebApi.Entities;

public enum Role
{
    Admin,
    User
}
User Entity
The user entity class represents the data stored in the database for users. Entities are used by Dapper to map SQL query results to C# objects and to pass parameters to SQL queries.
Entity classes are also used to pass data between different parts of the application (e.g. between repositories, services and controllers) and can be returned in HTTP responses from controller action methods.
The [JsonIgnore] attribute prevents the PasswordHash property from being serialized and returned in API responses.
When returned in API responses, the Role enum property is serialized into a string (instead of the default number) by the JsonStringEnumConverter() configured in the Program.cs file.
namespace WebApi.Entities;

using System.Text.Json.Serialization;

public class User
{
    public int Id { get; set; }
    public string? Title { get; set; }
    public string? FirstName { get; set; }
    public string? LastName { get; set; }
    public string? Email { get; set; }
    public Role Role { get; set; }

    [JsonIgnore]
    public string? PasswordHash { get; set; }
}
.NET App Exception
The app exception is a custom exception class used to differentiate between handled and unhandled exceptions in the ASP.NET Core API. Handled exceptions are generated by application code and used to return friendly error messages, for example business logic or validation exceptions caused by invalid request parameters, whereas unhandled exceptions are generated by the .NET framework or caused by bugs in application code.
namespace WebApi.Helpers;

using System.Globalization;

// custom exception class for throwing application specific exceptions (e.g. for validation)
// that can be caught and handled within the application
public class AppException : Exception
{
    public AppException() : base() {}

    public AppException(string message) : base(message) { }

    public AppException(string message, params object[] args)
        : base(String.Format(CultureInfo.CurrentCulture, message, args))
    {
    }
}
AutoMapper Profile
The automapper profile contains the mapping configuration used by the application, AutoMapper is a package available on Nuget that enables automatic mapping between different C# types. In this example we're using it to map between User entities and a couple of different model types - CreateRequest and UpdateRequest.
namespace WebApi.Helpers;

using AutoMapper;
using WebApi.Entities;
using WebApi.Models.Users;

public class AutoMapperProfile : Profile
{
    public AutoMapperProfile()
    {
        // CreateRequest -> User
        CreateMap<CreateRequest, User>();

        // UpdateRequest -> User
        CreateMap<UpdateRequest, User>()
            .ForAllMembers(x => x.Condition(
                (src, dest, prop) =>
                {
                    // ignore both null & empty string properties
                    if (prop == null) return false;
                    if (prop.GetType() == typeof(string) && string.IsNullOrEmpty((string)prop)) return false;

                    // ignore null role
                    if (x.DestinationMember.Name == "Role" && src.Role == null) return false;

                    return true;
                }
            ));
    }
}
PostgreSQL Data Context
The data context class is used to connect to the Postgres database with ADO.NET and return an IDbConnection instance. It is used by the user repository for handling all low level data (CRUD) operations for users.
The Init() method creates the PostgreSQL database and tables if they don't already exist, it is executed once on API startup from the Program.cs file.
namespace WebApi.Helpers;

using System.Data;
using Dapper;
using Microsoft.Extensions.Options;
using Npgsql;

public class DataContext
{
    private DbSettings _dbSettings;

    public DataContext(IOptions<DbSettings> dbSettings)
    {
        _dbSettings = dbSettings.Value;
    }

    public IDbConnection CreateConnection()
    {
        var connectionString = $"Host={_dbSettings.Server}; Database={_dbSettings.Database}; Username={_dbSettings.UserId}; Password={_dbSettings.Password};";
        return new NpgsqlConnection(connectionString);
    }

    public async Task Init()
    {
        await _initDatabase();
        await _initTables();
    }

    private async Task _initDatabase()
    {
        // create database if it doesn't exist
        var connectionString = $"Host={_dbSettings.Server}; Database=postgres; Username={_dbSettings.UserId}; Password={_dbSettings.Password};";
        using var connection = new NpgsqlConnection(connectionString);
        var sqlDbCount = $"SELECT COUNT(*) FROM pg_database WHERE datname = '{_dbSettings.Database}';";
        var dbCount = await connection.ExecuteScalarAsync<int>(sqlDbCount);
        if (dbCount == 0)
        {
            var sql = $"CREATE DATABASE \"{_dbSettings.Database}\"";
            await connection.ExecuteAsync(sql);
        }
    }

    private async Task _initTables()
    {
        // create tables if they don't exist
        using var connection = CreateConnection();
        await _initUsers();

        async Task _initUsers()
        {
            var sql = """
                CREATE TABLE IF NOT EXISTS Users (
                    Id SERIAL PRIMARY KEY,
                    Title VARCHAR,
                    FirstName VARCHAR,
                    LastName VARCHAR,
                    Email VARCHAR,
                    Role INTEGER,
                    PasswordHash VARCHAR
                );
            """;
            await connection.ExecuteAsync(sql);
        }
    }
}
Database Settings Class
The db settings class contains properties defined in the appsettings.json file under the "DbSettings" property, it's used for accessing application settings via objects that are injected into classes using the .NET built in dependency injection (DI) system. For example the data context accesses db settings via an IOptions<DbSettings> dbSettings object that is injected into the constructor.
Mapping of configuration sections to classes is done on startup in the Program.cs file.
namespace WebApi.Helpers;

public class DbSettings
{
    public string? Server { get; set; }
    public string? Database { get; set; }
    public string? UserId { get; set; }
    public string? Password { get; set; }
}
.NET Global Error Handler Middleware
The global error handler is used catch all errors and remove the need for duplicated error handling code throughout the ASP.NET Core API. It's configured as middleware in the Program.cs file.
Errors of type AppException are treated as custom (app specific) errors that return a 400 Bad Request response, the .NET built-in KeyNotFoundException class is used to return 404 Not Found responses, all other exceptions are unhandled and return a 500 Internal Server Error response as well as being logged to the console.
See the user service for examples of custom errors and not found errors thrown by the api.
namespace WebApi.Helpers;

using Microsoft.AspNetCore.Http;
using Microsoft.Extensions.Logging;
using System;
using System.Collections.Generic;
using System.Net;
using System.Text.Json;
using System.Threading.Tasks;

public class ErrorHandlerMiddleware
{
    private readonly RequestDelegate _next;
    private readonly ILogger _logger;

    public ErrorHandlerMiddleware(RequestDelegate next, ILogger<ErrorHandlerMiddleware> logger)
    {
        _next = next;
        _logger = logger;
    }

    public async Task Invoke(HttpContext context)
    {
        try
        {
            await _next(context);
        }
        catch (Exception error)
        {
            var response = context.Response;
            response.ContentType = "application/json";

            switch (error)
            {
                case AppException e:
                    // custom application error
                    response.StatusCode = (int)HttpStatusCode.BadRequest;
                    break;
                case KeyNotFoundException e:
                    // not found error
                    response.StatusCode = (int)HttpStatusCode.NotFound;
                    break;
                default:
                    // unhandled error
                    _logger.LogError(error, error.Message);
                    response.StatusCode = (int)HttpStatusCode.InternalServerError;
                    break;
            }

            var result = JsonSerializer.Serialize(new { message = error?.Message });
            await response.WriteAsync(result);
        }
    }
}
Create Request Model
The create request model defines the parameters for incoming POST requests to the /users route, it is attached to the route by setting it as the parameter to the Create action method of the users controller. When an HTTP POST request is received by the route, the data from the body is bound to an instance of the CreateRequest class, validated and passed to the method.
ASP.NET Core Data Annotations are used to automatically handle model validation, [Required] makes all properties required, [EmailAddress] validates that the email property contains a valid email address, [EnumDataType(typeof(Role))] validates that the role property matches one of the api roles (Admin or User), [MinLength(6)] validates that the password contains at least six characters, and [Compare("Password")] validates that the confirm password property matches the password property.
namespace WebApi.Models.Users;

using System.ComponentModel.DataAnnotations;
using WebApi.Entities;

public class CreateRequest
{
    [Required]
    public string? Title { get; set; }

    [Required]
    public string? FirstName { get; set; }

    [Required]
    public string? LastName { get; set; }

    [Required]
    [EnumDataType(typeof(Role))]
    public string? Role { get; set; }

    [Required]
    [EmailAddress]
    public string? Email { get; set; }

    [Required]
    [MinLength(6)]
    public string? Password { get; set; }

    [Required]
    [Compare("Password")]
    public string? ConfirmPassword { get; set; }
}
Update Request Model
The update request model defines the parameters for incoming PUT requests to the /users/{id} route, it is attached to the route by setting it as the parameter to the Update action method of the users controller. When an HTTP PUT request is received by the route, the data from the body is bound to an instance of the UpdateRequest class, validated and passed to the method.
ASP.NET Core Data Annotations are used to automatically handle model validation, [EnumDataType(typeof(Role))] validates that the role property matches one of the api roles (Admin or User), [EmailAddress] validates that the email property contains a valid email address, [MinLength(6)] validates that the password contains at least six characters, and [Compare("Password")] validates that the confirm password property matches the password property.
None of the properties have the [Required] attribute making them all optional, and any omitted fields are not updated in the database.
Some validation attributes don't handle empty strings well, the password properties replace empty strings with null on set to ensure that empty strings are ignored, because password fields are optional on the update user form in the example Angular and React client apps.
namespace WebApi.Models.Users;

using System.ComponentModel.DataAnnotations;
using WebApi.Entities;

public class UpdateRequest
{
    public string? Title { get; set; }
    public string? FirstName { get; set; }
    public string? LastName { get; set; }

    [EnumDataType(typeof(Role))]
    public string? Role { get; set; }

    [EmailAddress]
    public string? Email { get; set; }

    // treat empty string as null for password fields to
    // make them optional in front end apps
    private string? _password;
    [MinLength(6)]
    public string? Password
    {
        get => _password;
        set => _password = replaceEmptyWithNull(value);
    }

    private string? _confirmPassword;
    [Compare("Password")]
    public string? ConfirmPassword
    {
        get => _confirmPassword;
        set => _confirmPassword = replaceEmptyWithNull(value);
    }

    // helpers

    private string? replaceEmptyWithNull(string? value)
    {
        // replace empty string with null to make field optional
        return string.IsNullOrEmpty(value) ? null : value;
    }
}
Dapper User Repository
The user repository encapsulates all Postgres database interaction related to user CRUD operations. It uses Dapper extension methods to execute SQL queries and map results to strongly typed C# objects and collections.
The top of the file contains the IUserRepository interface that defines the user repository methods, just below that is the concrete UserService class that implements the interface.
namespace WebApi.Repositories;

using Dapper;
using WebApi.Entities;
using WebApi.Helpers;

public interface IUserRepository
{
    Task<IEnumerable<User>> GetAll();
    Task<User> GetById(int id);
    Task<User> GetByEmail(string email);
    Task Create(User user);
    Task Update(User user);
    Task Delete(int id);
}

public class UserRepository : IUserRepository
{
    private DataContext _context;

    public UserRepository(DataContext context)
    {
        _context = context;
    }

    public async Task<IEnumerable<User>> GetAll()
    {
        using var connection = _context.CreateConnection();
        var sql = """
            SELECT * FROM Users
        """;
        return await connection.QueryAsync<User>(sql);
    }

    public async Task<User> GetById(int id)
    {
        using var connection = _context.CreateConnection();
        var sql = """
            SELECT * FROM Users
            WHERE Id = @id
        """;
        return await connection.QuerySingleOrDefaultAsync<User>(sql, new { id });
    }

    public async Task<User> GetByEmail(string email)
    {
        using var connection = _context.CreateConnection();
        var sql = """
            SELECT * FROM Users
            WHERE Email = @email
        """;
        return await connection.QuerySingleOrDefaultAsync<User>(sql, new { email });
    }

    public async Task Create(User user)
    {
        using var connection = _context.CreateConnection();
        var sql = """
            INSERT INTO Users (Title, FirstName, LastName, Email, Role, PasswordHash)
            VALUES (@Title, @FirstName, @LastName, @Email, @Role, @PasswordHash)
        """;
        await connection.ExecuteAsync(sql, user);
    }

    public async Task Update(User user)
    {
        using var connection = _context.CreateConnection();
        var sql = """
            UPDATE Users
            SET Title = @Title,
                FirstName = @FirstName,
                LastName = @LastName,
                Email = @Email,
                Role = @Role,
                PasswordHash = @PasswordHash
            WHERE Id = @Id
        """;
        await connection.ExecuteAsync(sql, user);
    }

    public async Task Delete(int id)
    {
        using var connection = _context.CreateConnection();
        var sql = """
            DELETE FROM Users
            WHERE Id = @id
        """;
        await connection.ExecuteAsync(sql, new { id });
    }
}
.NET User Service
The user service is responsible for core business logic and validation related to user CRUD operations. It acts as the interface between controllers and repositories for performing actions on users and retrieving user data from PostgreSQL.
The top of the file contains an interface that defines the user service, just below that is the concrete user service class that implements the interface. BCrypt is used to hash and verify passwords, for more info see .NET 6.0 - Hash and Verify Passwords with BCrypt.
namespace WebApi.Services;

using AutoMapper;
using BCrypt.Net;
using WebApi.Entities;
using WebApi.Helpers;
using WebApi.Models.Users;
using WebApi.Repositories;

public interface IUserService
{
    Task<IEnumerable<User>> GetAll();
    Task<User> GetById(int id);
    Task Create(CreateRequest model);
    Task Update(int id, UpdateRequest model);
    Task Delete(int id);
}

public class UserService : IUserService
{
    private IUserRepository _userRepository;
    private readonly IMapper _mapper;

    public UserService(
        IUserRepository userRepository,
        IMapper mapper)
    {
        _userRepository = userRepository;
        _mapper = mapper;
    }

    public async Task<IEnumerable<User>> GetAll()
    {
        return await _userRepository.GetAll();
    }

    public async Task<User> GetById(int id)
    {
        var user = await _userRepository.GetById(id);

        if (user == null)
            throw new KeyNotFoundException("User not found");

        return user;
    }

    public async Task Create(CreateRequest model)
    {
        // validate
        if (await _userRepository.GetByEmail(model.Email!) != null)
            throw new AppException("User with the email '" + model.Email + "' already exists");

        // map model to new user object
        var user = _mapper.Map<User>(model);

        // hash password
        user.PasswordHash = BCrypt.HashPassword(model.Password);

        // save user
        await _userRepository.Create(user);
    }

    public async Task Update(int id, UpdateRequest model)
    {
        var user = await _userRepository.GetById(id);

        if (user == null)
            throw new KeyNotFoundException("User not found");

        // validate
        var emailChanged = !string.IsNullOrEmpty(model.Email) && user.Email != model.Email;
        if (emailChanged && await _userRepository.GetByEmail(model.Email!) != null)
            throw new AppException("User with the email '" + model.Email + "' already exists");

        // hash password if it was entered
        if (!string.IsNullOrEmpty(model.Password))
            user.PasswordHash = BCrypt.HashPassword(model.Password);

        // copy model props to user
        _mapper.Map(model, user);

        // save user
        await _userRepository.Update(user);
    }

    public async Task Delete(int id)
    {
        await _userRepository.Delete(id);
    }
}
.NET App Settings JSON
The appsettings.json file is the base configuration file in a ASP.Net Core API that contains settings for all environments (e.g. Development, Production). You can override values for different environments by creating environment specific appsettings files (e.g. appsettings.Development.json, appsettings.Production.json).
Postgres database settings
The "DbSettings" section contains the options for connecting to PostgreSQL. I configured them as separate properties (instead of a single connection string) for more flexibility and to enable accessing individual properties. It allows the data context class to first connect to the default postgres database to check if the API DB exists yet, if not it uses the "Database" value to auto create the API database on startup.
{
    "DbSettings": {
        "Server": "localhost",
        "Database": "dotnet-7-dapper-crud-api",
        "UserId": "postgres",
        "Password": "mysecretpassword"
    },
    "Logging": {
        "LogLevel": {
            "Default": "Information",
            "Microsoft.AspNetCore": "Warning"
        }
    }
}
.NET 7 Program
The .NET 7 Program file configures dependency injection, initializes the PostgresSQL database, configures the HTTP request pipeline and starts the API.
Compiled to Program.Main()
The .NET 7 Program file contains top-level statements which are converted by the C# 11 compiler into a Main() method and Program class for the .NET program. The Main() method is the entry point for a .NET application, when an app is started it searches for the Main() method to begin execution. The top-level statements can be located anywhere in the project but are typically placed in the Program.cs file, only one file can contain top-level statements within a .NET application.
ASP.NET Core WebApplication
The WebApplication class handles app startup, lifetime management, web server configuration and more. A WebApplicationBuilder is first created by calling the static method WebApplication.CreateBuilder(args), the builder is used to configure services for dependency injection (DI), a WebApplication instance is created by calling builder.Build(), the app instance is used to configure the HTTP request pipeline (middleware), then the app is started by calling app.Run().
Internally the WebApplicationBuilder class calls the ConfigureWebHostDefaults() extension method which configures hosting for the web app including setting Kestrel as the web server, adding host filtering middleware and enabling IIS integration. For more info on the default builder settings see https://docs.microsoft.com/aspnet/core/fundamentals/host/generic-host#default-builder-settings.
Postgres database initialization
The Init() method of the data context is executed once on startup to ensure the PostgreSQL database and all required tables exist.
using System.Text.Json.Serialization;
using WebApi.Helpers;
using WebApi.Repositories;
using WebApi.Services;

var builder = WebApplication.CreateBuilder(args);

// add services to DI container
{
    var services = builder.Services;
    var env = builder.Environment;

    services.AddCors();
    services.AddControllers().AddJsonOptions(x =>
    {
        // serialize enums as strings in api responses (e.g. Role)
        x.JsonSerializerOptions.Converters.Add(new JsonStringEnumConverter());

        // ignore omitted parameters on models to enable optional params (e.g. User update)
        x.JsonSerializerOptions.DefaultIgnoreCondition = JsonIgnoreCondition.WhenWritingNull;
    });
    services.AddAutoMapper(AppDomain.CurrentDomain.GetAssemblies());

    // configure strongly typed settings object
    services.Configure<DbSettings>(builder.Configuration.GetSection("DbSettings"));

    // configure DI for application services
    services.AddSingleton<DataContext>();
    services.AddScoped<IUserRepository, UserRepository>();
    services.AddScoped<IUserService, UserService>();
}

var app = builder.Build();

// ensure database and tables exist
{
    using var scope = app.Services.CreateScope();
    var context = scope.ServiceProvider.GetRequiredService<DataContext>();
    await context.Init();
}

// configure HTTP request pipeline
{
    // global cors policy
    app.UseCors(x => x
        .AllowAnyOrigin()
        .AllowAnyMethod()
        .AllowAnyHeader());

    // global error handler
    app.UseMiddleware<ErrorHandlerMiddleware>();

    app.MapControllers();
}

app.Run("http://localhost:4000");
.NET 7 Web Api csproj
The csproj (C# project) is an MSBuild based file that contains target framework and NuGet package dependency information for the application. The ImplicitUsings feature is enabled which tells the compiler to auto generate a set of global using directives based on the project type, removing the need to include a lot of common using statements in each class file. The global using statements are auto generated when you build the project and can be found in the file /obj/Debug/net7.0/WebApi.GlobalUsings.g.cs.
For more info on the C# project file see .NET + MSBuild - C# Project File (.csproj) in a Nutshell.
<Project Sdk="Microsoft.NET.Sdk.Web">
    <PropertyGroup>
        <TargetFramework>net7.0</TargetFramework>
        <Nullable>enable</Nullable>
        <ImplicitUsings>enable</ImplicitUsings>
        <RootNamespace>WebApi</RootNamespace>
    </PropertyGroup>
    <ItemGroup>
        <PackageReference Include="AutoMapper" Version="12.0.1" />
        <PackageReference Include="AutoMapper.Extensions.Microsoft.DependencyInjection" Version="12.0.0" />
        <PackageReference Include="BCrypt.Net-Next" Version="4.0.3" />
        <PackageReference Include="Dapper" Version="2.0.123" />
        <PackageReference Include="Npgsql" Version="7.0.2" />
    </ItemGroup>
</Project>
Other versions of this tutorial
The CRUD API tutorial is also available in the following versions:
- .NET: .NET 7.0 + Dapper + SQL Server, .NET 7.0 + Dapper + MySQL, .NET 7.0 + Dapper + SQLite, .NET 6.0 + EF Core, .NET 5.0 + EF Core
- Node: Node.js + MySQL, Node.js + MSSQL
Need Some .NET Help?
Search fiverr for freelance .NET developers.
Follow me for updates
When I'm not coding...
Me and Tina are on a motorcycle adventure around Australia.
Come along for the ride!