AWS - Create a VPC with Public and Private Subnets and a NAT Gateway
In this tutorial we'll go through the steps to create an AWS VPC (Virtual Private Cloud) with public and private subnets, and enable outbound internet access from the private subnets through a NAT (Network Address Translation) Gateway.
We'll be using the AWS Management Console (https://aws.amazon.com/console/) to perform all of the steps in the tutorial, the AWS Console can be a bit more manual than some other options (e.g. AWS CLI, CloudFormation, Terraform etc) but I find it helpful when learning to get a better understanding of all the pieces involved and how they fit together.
Tutorial Contents
- Create AWS VPC (Virtual Private Cloud)
- Create Public and Private Subnets
- Create Internet Gateway (IGW)
- Create NAT Gateway
- Configure Route Tables
- Remove everything from AWS (Clean up)
Create AWS VPC (Virtual Private Cloud)
An AWS VPC is a virtual private network in the AWS Cloud where you can provision and run different AWS resources (e.g. ECS container instances, Lambda functions, RDS database instances etc).
For more info on AWS VPC see https://docs.aws.amazon.com/vpc/latest/userguide/what-is-amazon-vpc.html.
Follow these steps to create your VPC:
- Sign into the AWS Management Console at https://aws.amazon.com/console/. If you don't have an account yet click the Create a Free Account button and follow the prompts.
- Go to the VPC Service section and select Your VPCs in the left menu.
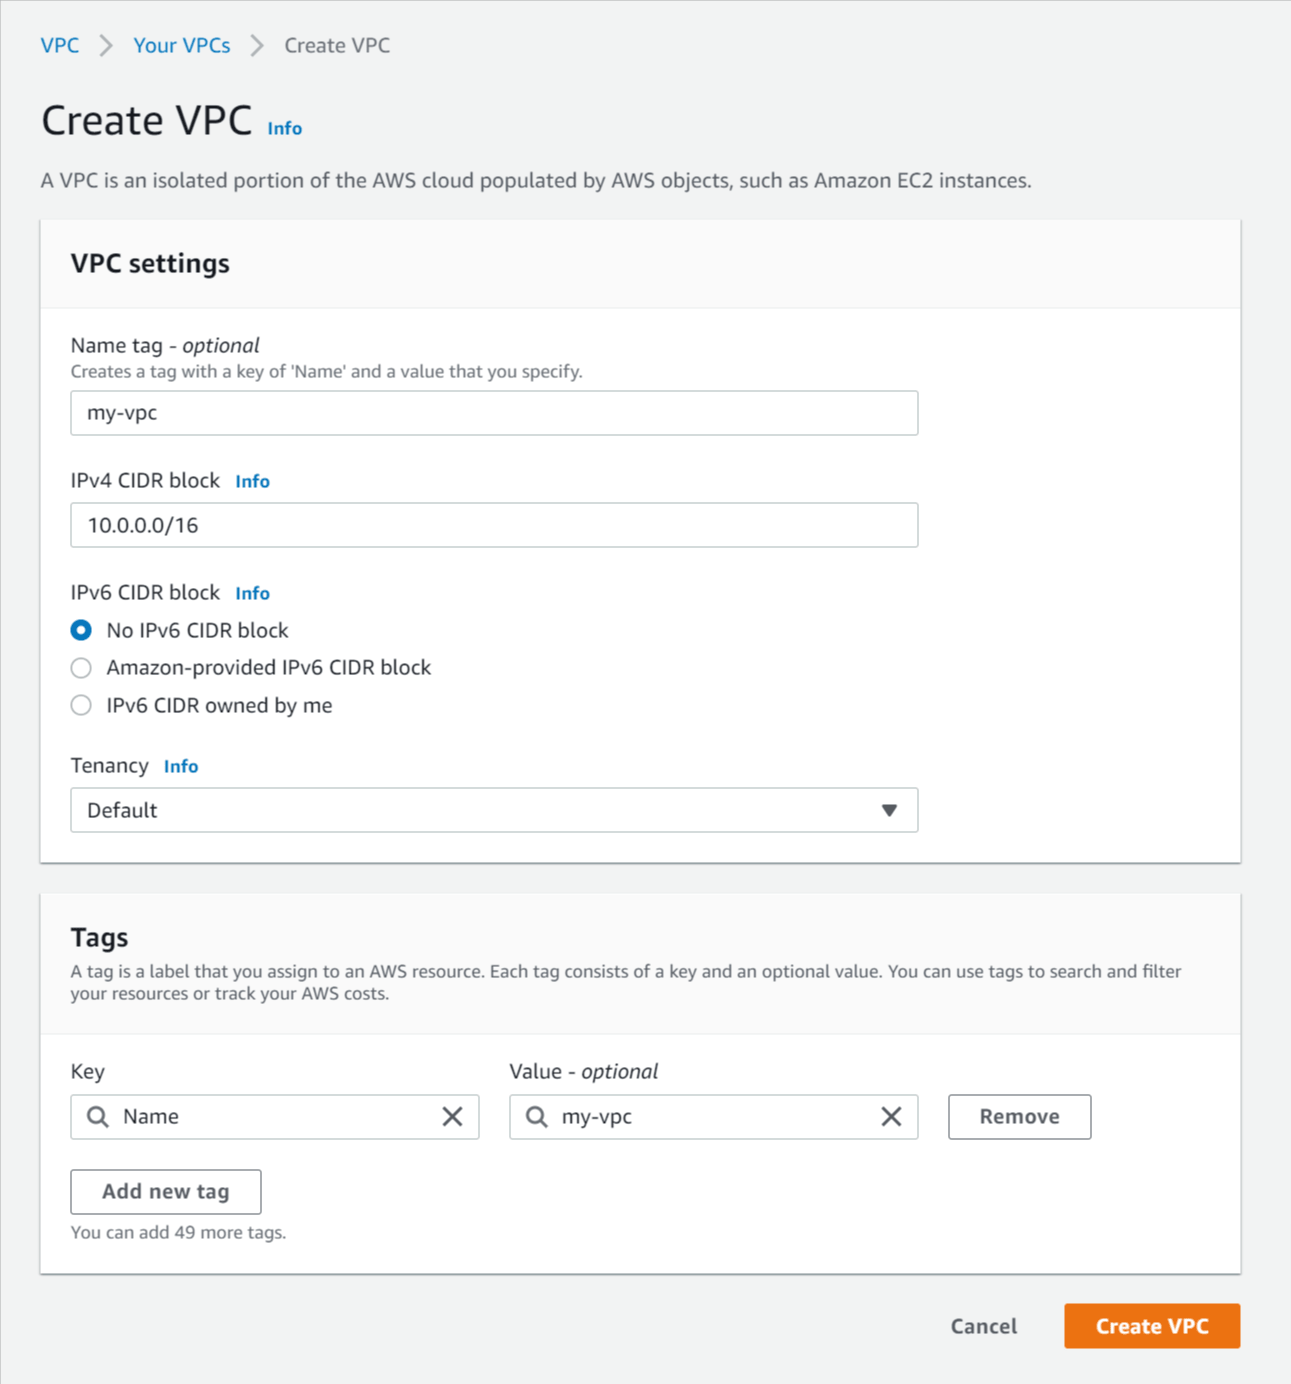
- Click Create VPC and enter the following details:
- Name tag - Enter a name for the VPC (e.g. my-vpc).
- IPv4 CIDR block - Enter a CIDR block to specify the IP address range available for the VPC. If you're not sure what to put you can enter 10.0.0.0/16 which specifies the IP address range from 10.0.0.0 to 10.0.255.255, giving your VPC up to 65,536 IP addresses.
For more info on CIDR notation and IP addressing see https://www.digitalocean.com/community/tutorials/understanding-ip-addresses-subnets-and-cidr-notation-for-networking. - IPv6 CIDR block - No IPv6 CIDR block.
- Tenancy - Default.
- Click Create VPC.
Step screenshots:
Create VPC
Create Public and Private Subnets
Next we'll create the subnets inside our VPC that will hold our AWS resources.
Public vs Private subnets
Subnets can be public (accessible from the internet) or private (not accessible from the internet), a subnet is public when it routes traffic through an Internet Gateway (IGW) attached the VPC. A subnet is private when it doesn't route traffic through an IGW, however outbound internet access can be enabled from a private subnet by routing traffic through a Network Address Translation (NAT) Gateway located in a public subnet.
For more info on AWS Subnets see https://docs.aws.amazon.com/vpc/latest/userguide/VPC_Subnets.html.
Subnets in multiple AZs
We'll create two public and two private subnets so each subnet type can cover multiple AZs (Availability Zones), this is required by some AWS resources (e.g. RDS databases) and is recommended by others (e.g. Lambda functions).
Follow these steps to create the subnets in your VPC:
- Select Subnets in the left menu.
- Click Create subnet and enter the following details:
- VPC ID - Select the VPC you created above.
- Subnet settings - Click Add new subnet three times to make four new subnet forms.
- Subnet 1 of 4 - Enter the following details:
- Subnet name - Enter public-subnet-1
- Availability Zone - Select the first option (e.g. ap-southeast-2a)
- Enter a CIDR block for each subnet that fits into your VPC CIDR block (e.g 10.0.0.0/24)
- Subnet 2 of 4 - Enter the following details:
- Subnet name - Enter public-subnet-2
- Availability Zone - Select the second option (e.g. ap-southeast-2b). This must be in a different AZ to public-subnet-1.
- Enter a CIDR block for each subnet that fits into your VPC CIDR block (e.g 10.0.1.0/24)
- Subnet 3 of 4 - Enter the following details:
- Subnet name - Enter private-subnet-1
- Availability Zone - Select the first option (e.g. ap-southeast-2a)
- Enter a CIDR block for each subnet that fits into your VPC CIDR block (e.g 10.0.2.0/24)
- Subnet 4 of 4 - Enter the following details:
- Subnet name - Enter private-subnet-2
- Availability Zone - Select the second option (e.g. ap-southeast-2b). This must be in a different AZ to private-subnet-1.
- Enter a CIDR block for each subnet that fits into your VPC CIDR block (e.g 10.0.3.0/24)
- Click Create subnet
Step screenshots:
Create subnets

Create Internet Gateway (IGW)
An AWS internet gateway (IGW) is used to enable internet access to and from subnets in your VPC. A subnet that routes traffic to an IGW is a public subnet, and a subnet that doesn't route traffic to an IGW is a private subnet. Routes are configured in route tables that we'll cover shortly.
For more on internet gateways see https://docs.aws.amazon.com/vpc/latest/userguide/VPC_Internet_Gateway.html.
Follow these steps to create an IGW and attach it to your VPC:
- Select Internet Gateways in the left menu.
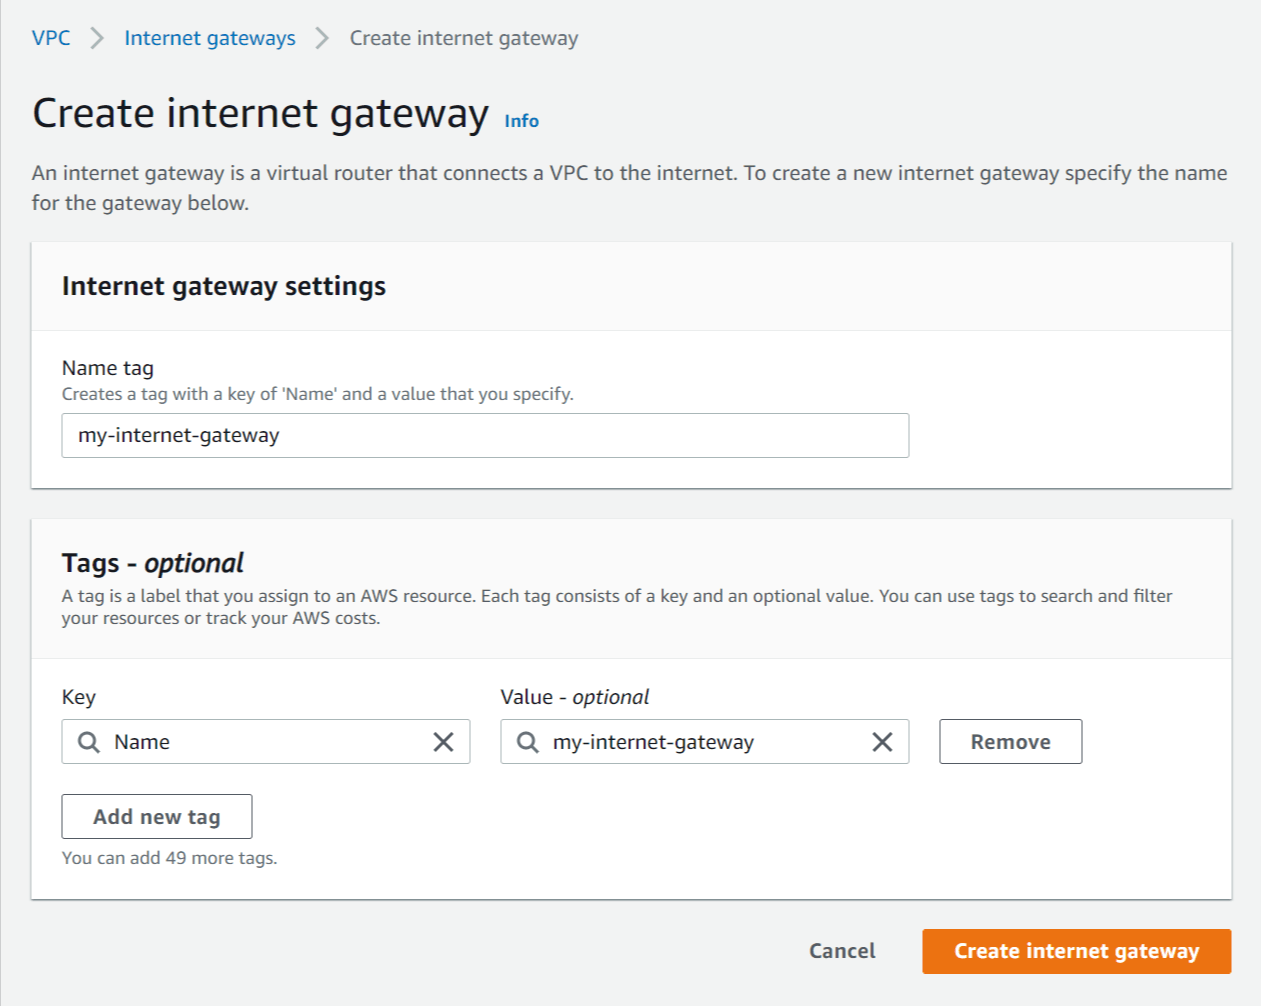
- Click Create internet gateway and enter the following details:
- Name tag - Enter a name for the internet gateway (e.g. my-internet-gateway).
- Click Create internet gateway.
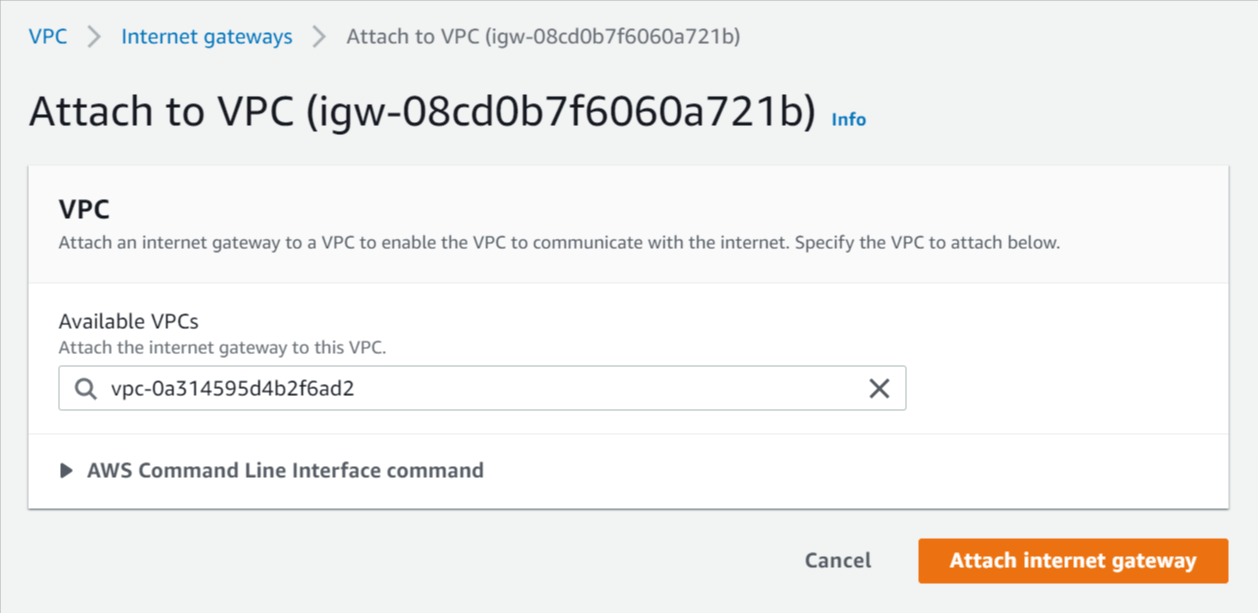
- Select Actions -> Attach to VPC.
- Select the VPC you created above and click Attach internet gateway.
Step screenshots:
Create internet gateway
Attach internet gateway
Create NAT Gateway
A network address translation (NAT) gateway is used to provide outbound internet access to AWS resources running in private subnets. A NAT gateway is located in a public subnet and acts like a proxy for outbound traffic from private subnets that route their traffic to the NAT gateway.
For more info on NAT gateways see https://docs.aws.amazon.com/vpc/latest/userguide/vpc-nat-gateway.html.
Follow these steps to create a NAT gateway in your public subnet:
- Select NAT Gateways in the left menu.
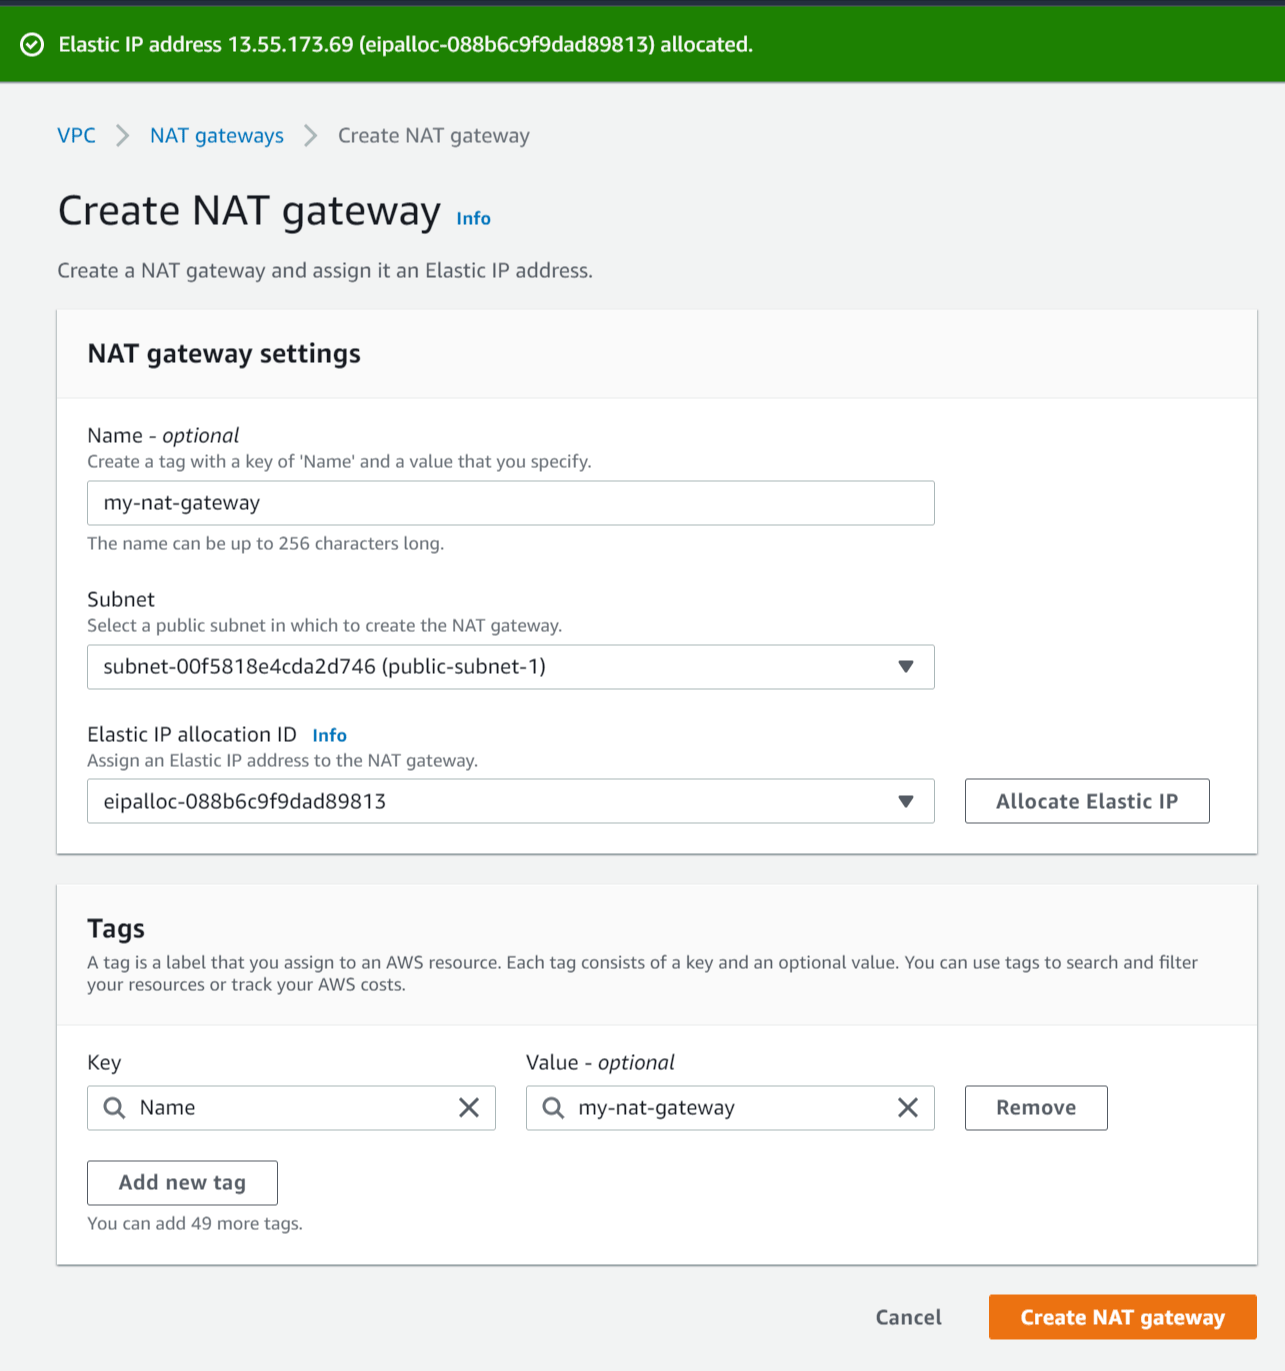
- Click Create NAT gateway and enter the following details:
- Name - Enter a name for the NAT gateway (e.g my-nat-gateway).
- Subnet - Select the subnet with the name public-subnet-1.
- Elastic IP allocation ID - Click Allocate Elastic IP to create a new elastic IP for the NAT gateway.
- Click Create NAT gateway.
Step screenshots:
Create NAT gateway (after allocating elastic IP)
Configure Route Tables
Route tables are used to control where network traffic is routed from subnets. Each VPC has one Main route table that is used by default for any subnet that isn't explicitly associated with a route table.
For more on AWS route tables see https://docs.aws.amazon.com/vpc/latest/userguide/VPC_Route_Tables.html.
Configure VPC main route table to be private
Here we'll configure the main route table in the VPC to target the NAT gateway to make subnets private by default. A private subnet is not accessible from the internet but can be given outbound internet access via a NAT Gateway located in a public subnet.
Follow these steps to configure the VPC main route table to be private:
- Select Route Tables in the left menu.
- Select the main route table for the VPC you created above.
- Hover the mouse over the Name column of the selected route table, then click the edit icon and enter the name main-route-table.
- Click the Routes tab below and click Edit routes.
- Click Add route and enter the following details:
- Destination - Enter 0.0.0.0/0 to match all non-local traffic.
- Target - Select NAT Gateway then select the NAT gateway you created above.
- Click Save routes.
Step screenshots:
Add route to NAT gateway

Create new route table for public subnets
Here we'll create a new route table that targets the internet gateway (IGW) that will be used by public subnets. A public subnet is accessible from the internet by being associated with a route table that targets an IGW.
Follow these steps to create a route table and associate it with public subnets:
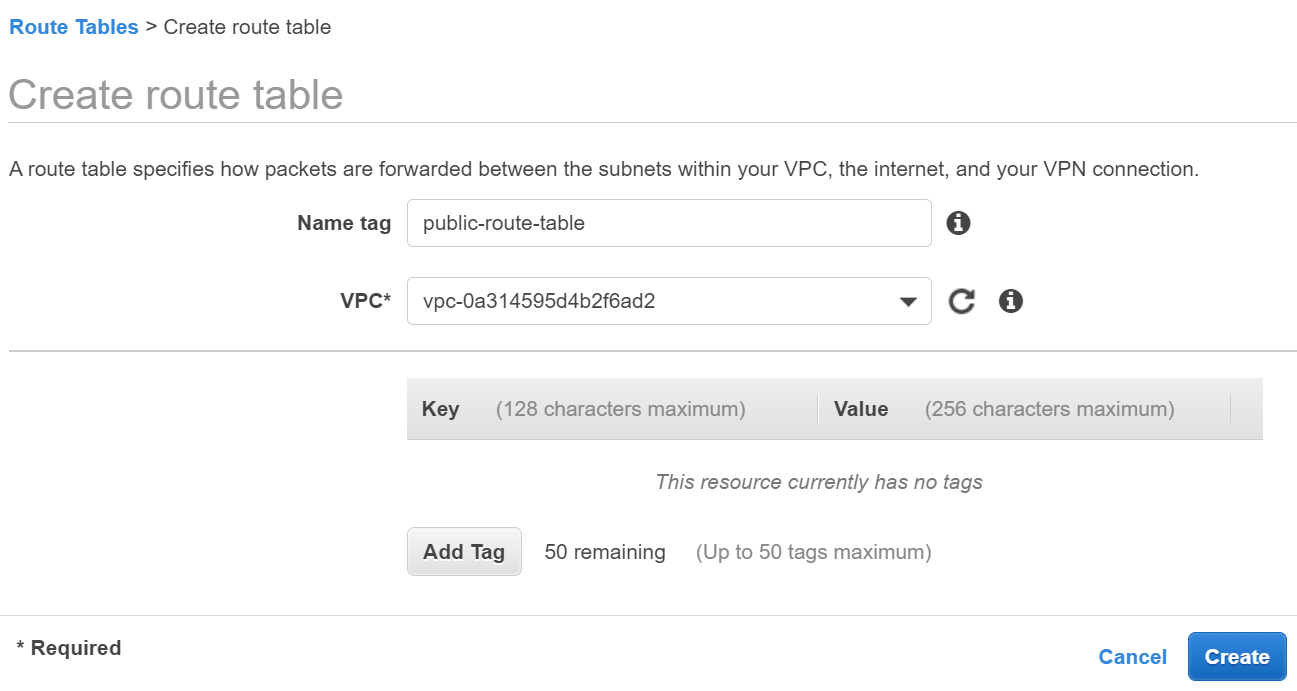
- Click Create route table and enter the following details:
- Name tag - Enter a name for the route table (e.g. public-route-table).
- VPC - Select the VPC you created above.
- Click Create then click the link displayed with the new route table ID.
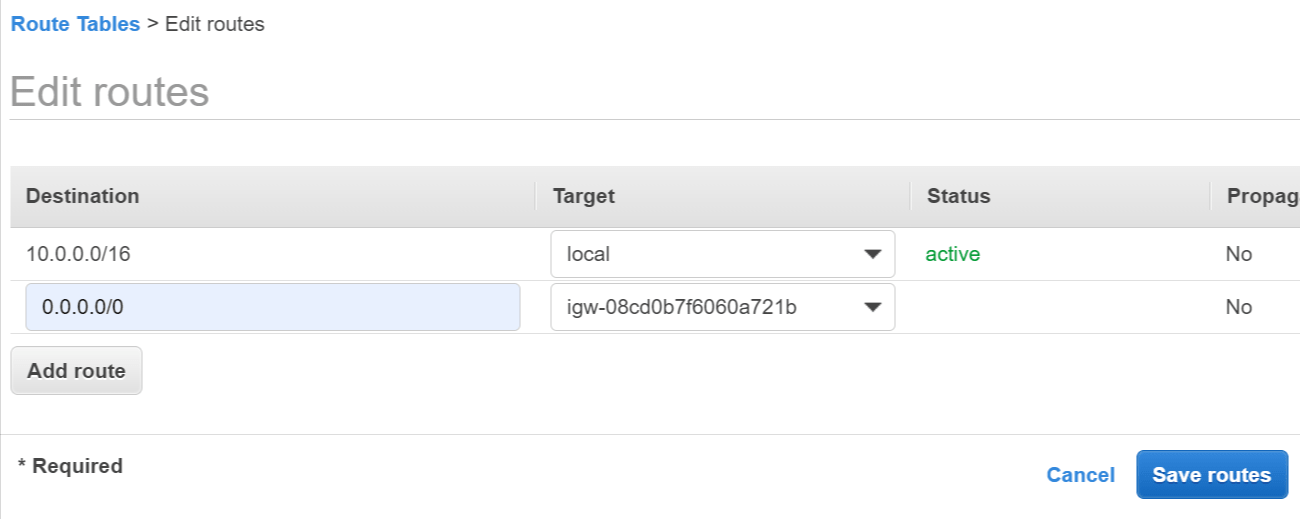
- Click the Routes tab and Edit routes.
- Click Add route and enter the following details:
- Destination - Enter 0.0.0.0/0 to match all non-local traffic.
- Target - Select Internet Gateway then select the internet gateway you created above.
- Click Save routes.
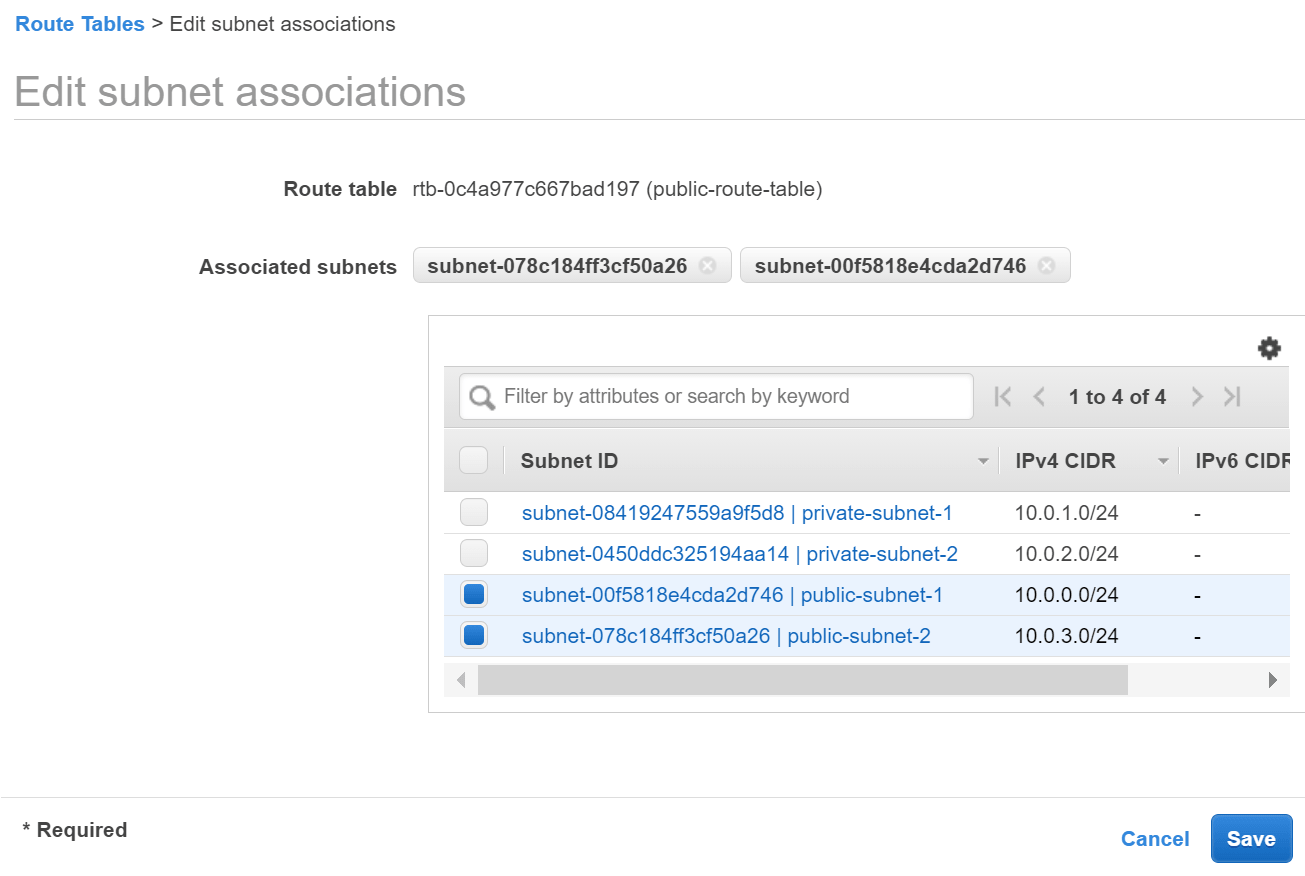
- Navigate back to the Route tables list and select the public-route-table you just created.
- Click the Subnet Associations tab and Edit subnet associations.
- Select the subnets named public-subnet-1 and public-subnet-2 and click Save.
Step screenshots:
Create route table
Click link with the new route table ID

Add route to internet gateway (IGW)
Associate route table with public subnets
Remove everything from AWS (Clean up)
When you're finished you can remove/delete all of the AWS resources created in the tutorial to avoid incurring any unnecessary costs.
Follow these steps to clean up the resources created in AWS:
Delete NAT Gateway
- Go to the VPC Service section and select NAT Gateways in the left menu.
- Select the NAT gateway created above (my-nat-gateway) and click Actions and Delete NAT gateway.
- Enter delete into the confirmation text field and click Delete.
Release Elastic IP
- After the NAT gateway is deleted select Elastic IP addresses in the left menu.
- Select the IP address that was allocated to the NAT gateway, click Actions and Release Elastic IP address.
Delete VPC
- Select Your VPCs in the left menu.
- Select the VPC you created at the start of the tutorial (my-vpc) and click Actions and Delete VPC.
- Enter delete into the confirmation text field and click Delete.
Need Some AWS Help?
Search fiverr for freelance AWS developers.
Follow me for updates
When I'm not coding...
Me and Tina are on a motorcycle adventure around Australia.
Come along for the ride!
