
.NET Core 3.1 + AWS Lambda - Deploy a .NET Core API and SQL Server DB to Lambda and RDS
In this tutorial we'll go through all of the steps to setup an AWS environment from scratch, then deploy a .NET Core 3.1 API to AWS Lambda that connects to a SQL Server database running on AWS RDS (Relational Database Service) and sends email using AWS SES (Amazon Simple Email Service).
Boilerplate .NET Core 3.1 API
The .NET Core API we'll be using is a boilerplate API I posted recently that supports email sign up and CRUD functionality, I won't cover the API code in detail here but the full documentation is available at ASP.NET Core 3.1 - Boilerplate API with Email Sign Up, Verification, Authentication & Forgot Password. This post will be focused on the steps to setup and configure each of the required AWS services and deploy the example .NET Core API.
Setup and deploy with the AWS Management Console
We'll be using the AWS Management Console (https://aws.amazon.com/console/) to perform all of the steps in the tutorial, the AWS Console can be a bit more manual than some other options (e.g. AWS CLI, CloudFormation, Terraform etc) but I find it helpful when learning to get a better understanding of all the pieces involved and how they fit together.
Tutorial Contents
- Create AWS VPC (Virtual Private Cloud)
- Create SQL Server Instance in AWS RDS
- Configure Email in AWS SES
- Create AWS Lambda Function
- Create HTTP API in AWS API Gateway
- Download and Update .NET Core API to run on AWS Lambda
- Deploy .NET Core API to Lambda
- Test API with Postman
- Remove everything from AWS (Clean up)
Create AWS VPC (Virtual Private Cloud)
An AWS VPC is a virtual private network in the AWS Cloud where you can provision and run different AWS resources. In this tutorial we'll be running our .NET Core Lambda function and SQL Server RDS instance inside a VPC.
For more info on AWS VPC see https://docs.aws.amazon.com/vpc/latest/userguide/what-is-amazon-vpc.html.
Follow these steps to create your VPC:
- Sign into the AWS Management Console at https://aws.amazon.com/console/. If you don't have an account yet click the Create a Free Account button and follow the prompts.
- Go to the VPC Service section and select Your VPCs in the left menu.
- Click Create VPC and enter the following details:
- Name tag - Enter a name for the VPC (e.g. my-vpc).
- IPv4 CIDR block - Enter a CIDR block to specify the IP address range available for the VPC. If you're not sure what to put you can enter 10.0.0.0/16 which specifies the IP address range from 10.0.0.0 to 10.0.255.255, giving your VPC up to 65,536 IP addresses.
For more info on CIDR notation and IP addressing see https://www.digitalocean.com/community/tutorials/understanding-ip-addresses-subnets-and-cidr-notation-for-networking. - IPv6 CIDR block - No IPv6 CIDR block.
- Tenancy - Default.
- Click Create VPC.
- Click the Actions dropdown and select Edit DNS hostnames.
- Set DNS hostnames to Enabled and click Save changes (this is required to enable access to our SQL Server database a bit later).
Step screenshots:
Create VPC

Edit DNS hostnames

Create Subnets
Next we'll create the subnets inside our VPC that will hold our AWS resources.
Public vs Private subnets
Subnets can be public (accessible from the internet) or private (not accessible from the internet), a subnet is public when it routes traffic through an Internet Gateway (IGW) attached the VPC. A subnet is private when it doesn't route traffic through an IGW, however outbound internet access can be enabled from a private subnet by routing traffic through a Network Address Translation (NAT) Gateway located in a public subnet.
For more info on AWS Subnets see https://docs.aws.amazon.com/vpc/latest/userguide/VPC_Subnets.html.
Subnets required for this example
We need two public and two private subnets for this example. The SQL Server database will run in the public subnets so you can connect to it from your machine and create the database using EF Core migrations (more on this later). Two public subnets are required because DB Subnet Groups must cover at least two availability zones.
The Lambda function must run in private subnets with outbound internet access so it can send emails via SMTP with AWS SES, also it must run in our VPC so it can connect to the SQL database (by default Lambda functions run in an AWS managed VPC that doesn't have access to resources in our VPC). Unlike other AWS resources, Lambda functions are not accessible from the internet by placing them in a public subnet, access is enabled via an API Gateway (more on this later). We'll create two private subnets because AWS recommends at least 2 subnets for Lambda to run your functions in high availability mode.
Follow these steps to create the required subnets in your VPC:
- Select Subnets in the left menu.
- Click Create subnet and enter the following details:
- VPC ID - Select the VPC you created above.
- Subnet settings - Click Add new subnet three times to make four new subnet forms.
- Subnet 1 of 4 - Enter the following details:
- Subnet name - Enter public-subnet-1
- Availability Zone - Select the first option (e.g. ap-southeast-2a)
- Enter a CIDR block for each subnet that fits into your VPC CIDR block (e.g 10.0.0.0/24)
- Subnet 2 of 4 - Enter the following details:
- Subnet name - Enter public-subnet-2
- Availability Zone - Select the second option (e.g. ap-southeast-2b). This must be in a different AZ to public-subnet-1.
- Enter a CIDR block for each subnet that fits into your VPC CIDR block (e.g 10.0.1.0/24)
- Subnet 3 of 4 - Enter the following details:
- Subnet name - Enter private-subnet-1
- Availability Zone - Select the first option (e.g. ap-southeast-2a)
- Enter a CIDR block for each subnet that fits into your VPC CIDR block (e.g 10.0.2.0/24)
- Subnet 4 of 4 - Enter the following details:
- Subnet name - Enter private-subnet-2
- Availability Zone - Select the second option (e.g. ap-southeast-2b). This must be in a different AZ to private-subnet-1.
- Enter a CIDR block for each subnet that fits into your VPC CIDR block (e.g 10.0.3.0/24)
- Click Create subnet
Step screenshots:
Create subnets

Create Internet Gateway (IGW)
An AWS internet gateway (IGW) is used to enable internet access to and from subnets in your VPC. A subnet that routes traffic to an IGW is a public subnet, and a subnet that doesn't route traffic to an IGW is a private subnet. Routes are configured in route tables that we'll see shortly.
For more on internet gateways see https://docs.aws.amazon.com/vpc/latest/userguide/VPC_Internet_Gateway.html.
Follow these steps to create an IGW and attach it to your VPC:
- Select Internet Gateways in the left menu.
- Click Create internet gateway and enter the following details:
- Name tag - Enter a name for the internet gateway (e.g. my-internet-gateway).
- Click Create internet gateway.
- Select Actions -> Attach to VPC.
- Select the VPC you created above and click Attach internet gateway.
Step screenshots:
Create internet gateway
")
Attach internet gateway

Create NAT Gateway
A network address translation (NAT) gateway is used to provide outbound internet access to AWS resources running in private subnets. A NAT gateway is located in a public subnet and acts like a proxy for outbound traffic from private subnets that route their traffic to the NAT gateway.
For more info on NAT gateways see https://docs.aws.amazon.com/vpc/latest/userguide/vpc-nat-gateway.html.
Follow these steps to create a NAT gateway in your public subnet:
- Select NAT Gateways in the left menu.
- Click Create NAT gateway and enter the following details:
- Name - Enter a name for the NAT gateway (e.g my-nat-gateway).
- Subnet - Select the subnet with the name public-subnet-1.
- Elastic IP allocation ID - Click Allocate Elastic IP to create a new elastic IP for the NAT gateway.
- Click Create NAT gateway.
Step screenshots:
Create NAT gateway (after allocating elastic IP)

Configure Route Tables
Route tables are used to control where network traffic is routed from subnets. Each VPC has one Main route table that is used by default for any subnet that isn't associated with a specific route table.
For more on AWS route tables see https://docs.aws.amazon.com/vpc/latest/userguide/VPC_Route_Tables.html.
Configure VPC main route table to be private
Here we'll configure the main route table for our VPC to target the NAT gateway to make our subnets private by default. A private subnet is not accessible from the internet but can be given outbound internet access via a NAT Gateway located in a public subnet.
Follow these steps to configure the VPC main route table to be private:
- Select Route Tables in the left menu.
- Select the main route table for the VPC you created above.
- Hover the mouse over the Name column of the selected route table, then click the edit icon and enter the name main-route-table.
- Click the Routes tab below and click Edit routes.
- Click Add route and enter the following details:
- Destination - Enter 0.0.0.0/0 to match all non-local traffic.
- Target - Select NAT Gateway then select the NAT gateway you created above.
- Click Save routes.
Step screenshots:
Add route to NAT gateway

Create new route table for public subnets
Here we'll create a new route table that targets the internet gateway (IGW) that will be used by our public subnets. A public subnet is accessible from the internet by being associated with a route table that targets an IGW.
Follow these steps to create a route table and associate it with our public subnets:
- Click Create route table and enter the following details:
- Name tag - Enter a name for the route table (e.g. public-route-table).
- VPC - Select the VPC you created above.
- Click Create then click the link displayed with the new route table ID.
- Click the Routes tab and Edit routes.
- Click Add route and enter the following details:
- Destination - Enter 0.0.0.0/0 to match all non-local traffic.
- Target - Select Internet Gateway then select the internet gateway you created above.
- Click Save routes.
- Navigate back to the Route tables list and select the public-route-table you just created.
- Click the Subnet Associations tab and Edit subnet associations.
- Select the subnets named public-subnet-1 and public-subnet-2 and click Save.
Step screenshots:
Create route table

Click link with the new route table ID

Add route to internet gateway (IGW)
")
Associate route table with public subnets

Configure VPC Security Group
Next we'll add a rule to the default VPC security group to allow inbound traffic from your IP address. This will enable you to connect to the SQL Server instance that we'll create in the next section.
Follow these steps to configure the SG:
- Select Security Groups in the left menu.
- Click the link to details of the default security group for the VPC created above.
- Click Edit inbound rules.
- Click Add rule and enter the following details:
- Type - Select All traffic.
- Source - Select My IP.
- Click Save rules.
Step screenshots:
Add inbound rule for "My IP" to security group

Create SQL Server Instance in AWS RDS
In this section we'll create a SQL Server database instance in our VPC with the Amazon Relational Database Service. The database will be used by our .NET Core API running in Lambda.
Follow these steps to create a database in RDS:
- Go to the RDS Service section and select Subnet groups in the left menu.
- Click Create DB Subnet Group and enter the following details:
- Name - Enter a name for the subnet group (e.g. public-subnets).
- Description - Enter a description (e.g. Public subnets).
- VPC - Select the VPC you created above.
- Availability Zones - Select the AZs that contain your public subnets (e.g. ap-southeast-2a, ap-southeast-2b).
- Subnets - Select the two public subnets you created above (one in each AZ). Subnet names are not displayed here so you can either select the CIDR blocks for the public subnets (10.0.0.0/24, 10.0.1.0/24) or check the IDs for the public subnets in the VPC section of the AWS console.
- Click Create.
- Select Databases in the left menu.
- Click Create database and enter the following details:
- Database creation method - Standard create.
- Engine type - Microsoft SQL Server.
- Edition - SQL Server Express Edition.
- Templates - Free tier (you may need to switch to the previous major SQL Server version for the Templates option to appear, e.g. SQL Server 2017).
- Credential Settings - Select Auto generate a password.
- DB instance class - Leave default settings (it should be db.t2.micro if Free tier is selected above in Templates).
- Storage - Leave default settings.
- Virtual private cloud (VPC) - Select the VPC you created above.
- Subnet group - Select the DB subnet group you just created (public-subnets).
- Public access - Select Yes.
- Click Create database.
- IMPORTANT: Click View credential details and save a copy of the Master password, this is the only time you will be able to view the password.
Step screenshots:
Create DB Subnet Group

Create SQL Server database

View credential details button

Password for your database

Configure Email in AWS SES
AWS SES access is required by the .NET Core boilerplate API to send account verification and forgot password emails.
Verify Email Addresses
Sender/from addresses must be verified in AWS SES before you can send emails from them. For SES accounts with "Sandbox" access (the default access for new accounts) recipient/to addresses also need to be verified.
Follow these steps to verify email addresses in AWS SES and to check if your account has "Sandbox" or "Production" access:
- Go to the Simple Email Service section and select Email Addresses in the left menu.
- Click Verify a New Email Address, enter the from address you will be using to send email from the .NET Core API and click Verify This Email Address. For testing you can create temporary disposable email addresses at https://temp-mail.org/.
- Open your email inbox and click the verification link sent from AWS (or copy the link url into a browser), then refresh the email addresses in the AWS SES Console and the verification status should change to verified.
- Go to Sending Statistics under Email Sending, if your Production Access is set to Sandbox, repeat steps 2 and 3 for the to email address/es you will be using.
Step screenshots:
Verify a New Email Address

How to request production access in AWS SES
To request full access to be able to send to any (unverified) email address go to Sending Statistics under Email Sending and click Edit Account Details, for more info see https://docs.aws.amazon.com/ses/latest/dg/request-production-access.html.
Attempting to send to an unverified address from an account with "Sandbox" access results in the error: Message rejected: Email address is not verified. The following identities failed the check in region.
Create SMTP Credentials
SMTP credentials are the username and password that will be used by our .NET Core API to authenticate with AWS SES to send emails.
- Go to SMTP Settings under Email Sending.
- Click Create My SMTP Credentials, this will take you to the AWS Identity and Access Management (IAM) section to create a new user with access to send email.
- Click Create to setup your SMTP credentials. Optionally you can update the IAM Username or keep the default one generated by AWS.
- Click Show User SMTP Security Credentials and copy/download the username and password.
Step screenshots:
Create SMTP Credentials

Download SMTP Credentials

Create AWS Lambda Function
In this section we'll create the AWS Lambda function that will run our .NET Core API.
Create new IAM role to enable Lambda to execute in the VPC
Before creating the Lambda function we need to create a new IAM (Identity and Access Management) role that will give the Lambda function permission to connect to our VPC.
Follow these steps to create the new role:
- Go to the IAM Service section and select Roles in the left menu.
- Click Create Role and enter the following details:
- Select type of trusted entity - Select AWS service.
- Choose a use case - Select Lambda and click Next: Permissions.
- Attach permissions policies - Select AWSLambdaVPCAccessExecutionRole and click Next: Tags.
- Add tags (optional) - Leave empty and click Next: Review.
- Role name - Enter a role name (e.g. my-lambda-execution-role).
- Click Create role.
Step screenshots:
Create Lambda Role - Choose a use case

Create Lambda Role - Attach permissions policies

Create Lambda Role - Review

Create Lambda function for .NET Core API
Follow these steps to create the Lambda function that will run our .NET Core API:
- Go to the Lambda service section.
- Click Create function and enter the following details:
- Select the option Author from scratch.
- Function name - Enter a name for the function (e.g. my-dotnet-lambda).
- Runtime - Select .NET Core 3.1 (C#/PowerShell).
- Click Change default execution role then Use an existing role and select the IAM role you created above (my-lambda-execution-role).
- Click Advanced settings and enter the following details:
- VPC - Select the VPC you created above (my-vpc).
- Subnets - Select the 2 private subnets (private-subnet-1 and private-subnet-2).
- Security groups - Select the default VPC security group.
- Click Create function.
Step screenshots:
Create Lambda Function

Create HTTP API in AWS API Gateway
Next we'll create an HTTP API in AWS API Gateway to enable us to invoke our Lambda function via a public URL.
Follow these steps to create an HTTP API and integrate it with our Lambda function:
- Go to the API Gateway service section.
- Click Create API (not required if this is your first api gateway).
- Click Build under HTTP API.
- Click the Add integration button and enter the following details:
- Select Lambda from the first dropdown list.
- AWS Region - Leave default.
- Lambda function - Select the lambda function you created above (my-dotnet-lambda).
- Version - Select 2.0.
- API name - enter a name for the api (e.g. my-http-api).
- Click Next.
- Configure routes - configure a single route with the following details:
- Method - Select ANY.
- Resource path - Enter /{proxy+}
- Integration target - Select the lambda you created above (my-dotnet-lambda).
- Click Next.
- Configure stages - Leave the default stage name set to $default and click Next.
- Review and create - Click Create.
Step screenshots:
Create HTTP API - Create and configure integrations

Create HTTP API - Configure routes

Create HTTP API - Review and create

Download and Update .NET Core API to run on AWS Lambda
In this section we're going to download the .NET Core boilerplate API and update it to run on AWS Lambda with SQL Server.
- Download or clone the .NET Core API from https://github.com/cornflourblue/aspnet-core-3-signup-verification-api.
- Update the API code to connect to a SQL Server database (it uses SQLite by default):
- Open the
/WebApi.csprojfile and replace the package referenceMicrosoft.EntityFrameworkCore.SqlitewithMicrosoft.EntityFrameworkCore.SqlServer. The updated package reference look like the following:<PackageReference Include="Microsoft.EntityFrameworkCore.SqlServer" Version="3.1.6" /> - Restore all NuGet packages by running the command
dotnet restorefrom the project root folder (where the WebApi.csproj file is located). - Open the DataContext (
/Helpers/DataContext.cs) and replaceoptions.UseSqlite(...)withoptions.UseSqlServer(...)in theOnConfiguring()method. The updated method should look like the following:protected override void OnConfiguring(DbContextOptionsBuilder options) { // connect to sql server database options.UseSqlServer(Configuration.GetConnectionString("WebApiDatabase")); } - Delete all files from the
/Migrationsfolder, these are the default database migration files for SQLite. - Generate new migration files for SQL Server by running the command
dotnet ef migrations add InitialCreate.
This requires the .NET Entity Framework Core tools (dotnet ef) to be installed, to install the EF Core tools globally rundotnet tool install -g dotnet-ef. For more info on EF Core tools see https://docs.microsoft.com/en-us/ef/core/cli/dotnet
- Open the
- Update the database connection string in app settings (
/appsettings.json) to point to the SQL Server instance running in AWS RDS:- In the AWS Console, go to the RDS Service section and select Databases in the left menu.
- Click the link to the SQL Server database you created above (database-1).
- Copy the database endpoint URL from the Connectivity & security section under Endpoint & port. It should look something like the following:
database-1.cj0ovpym8wfu.ap-southeast-2.rds.amazonaws.com - Open
/appsettings.jsonand update theWebApiDatabaseconnection string to point to the SQL Server instance running in AWS. The connection string should be in the following format:
So after updating the connection string with your database details it should look something like the following:Data Source=[DB SERVER URL]; Initial Catalog=[DB NAME]; User Id=[USERNAME]; Password=[PASSWORD]Data Source=database-1.cj0ovpym8wfu.ap-southeast-2.rds.amazonaws.com; Initial Catalog=my-database; User Id=admin;Password=OwwkG3aBDEjPMrQuwNuw
- Update the SMTP config in app settings (
/appsettings.json) with AWS SES credentials:- In the AWS Console, go to the Simple Email Service and select SMTP Settings in the left menu.
- Copy the Server Name value, it should look like the following:
email-smtp.ap-southeast-2.amazonaws.com - Open
/appsettings.jsonand update theSmtpHostwith the SMTP Server Name, update theSmtpUserandSmtpPasswith the SMTP Credentials you downloaded while configuring AWS SES above, and update theEmailFromwith one of the email addresses you verified in AWS SES. The updated email settings should look something like the following:"EmailFrom": "[email protected]", "SmtpHost": "email-smtp.ap-southeast-2.amazonaws.com", "SmtpPort": 587, "SmtpUser": "AKIA2CYRMDKQOSOP3CX7", "SmtpPass": "BBZpEyCGp5dp8oYu/ql31lX4dlhZRKOmigk585LfawRM"
- Update the API to support running on AWS Lambda:
- Install the Amazon.Lambda.AspNetCoreServer NuGet package by running the command
dotnet add package Amazon.Lambda.AspNetCoreServer. This package enables you to run an ASP.NET Core Web API as a Lambda function, for more info see https://github.com/aws/aws-lambda-dotnet/tree/master/Libraries/src/Amazon.Lambda.AspNetCoreServer. - Create the file
/LambdaEntryPoint.cswith the below code, this class will be the entry point for AWS Lambda to call into the .NET Core API.using Amazon.Lambda.AspNetCoreServer; using Microsoft.AspNetCore.Hosting; namespace WebApi { public class LambdaEntryPoint : APIGatewayHttpApiV2ProxyFunction { protected override void Init(IWebHostBuilder builder) { builder.UseStartup<Startup>(); } } }
- Install the Amazon.Lambda.AspNetCoreServer NuGet package by running the command
Step screenshots:
Copy database endpoint URL from "Connectivity & security"

Deploy .NET Core API to Lambda
In this section we'll execute our SQL Server database migrations to create the db in AWS RDS, then package up the .NET Core API using the dotnet CLI and deploy it to AWS Lambda.
- Run the command
dotnet ef database updatefrom the project root folder (where the WebApi.csproj file is located) to create the database and tables for the .NET Core API. Ensure your database Status is Available in the AWS Console first. - Install the AWS Lambda Extensions for the dotnet CLI with the command
dotnet tool install -g Amazon.Lambda.Tools. This tool enables you to package and deploy .NET Core applications to Lambda. - Run the command
dotnet lambda packageto generate a zip file of the API that can be deployed to AWS Lambda (located in/bin/Release/netcoreapp3.1/aspnet-core-3-signup-verification-api.zip). - In the AWS Console, go to the Lambda Service section.
- Click the link to the lambda function you created above (my-dotnet-lambda).
- Under Code source click Upload from and select .zip file.
- Click Upload, select the application zip file you generated above (
/bin/Release/netcoreapp3.1/aspnet-core-3-signup-verification-api.zip) and click Save. - Under Runtime settings click Edit.
- Update the Handler to point to the LambdaEntryPoint class you created above (WebApi::WebApi.LambdaEntryPoint::FunctionHandlerAsync).
- Click Save.
Step screenshots:
Lambda function details with "Upload from" button

Upload a .zip file to Lambda

Lambda runtime settings (located on function details page)

Edit Lambda runtime settings

Test .NET Core API with Postman
To test that everything is deployed and working correctly we'll register a new account with the API. Registering a new account will create a record in the SQL database and send a verification email, which tests all the components of the API.
For instructions on testing all of the other functionality of the API including account verification, authentication, forgot password, reset password and account CRUD operations go to the testing section of the main tutorial for the API - Testing the ASP.NET Core Boilerplate API with Postman.
We'll use Postman to test the API which you can download at https://www.postman.com/downloads.
Follow these steps to register a new account with the .NET Core API running on AWS:
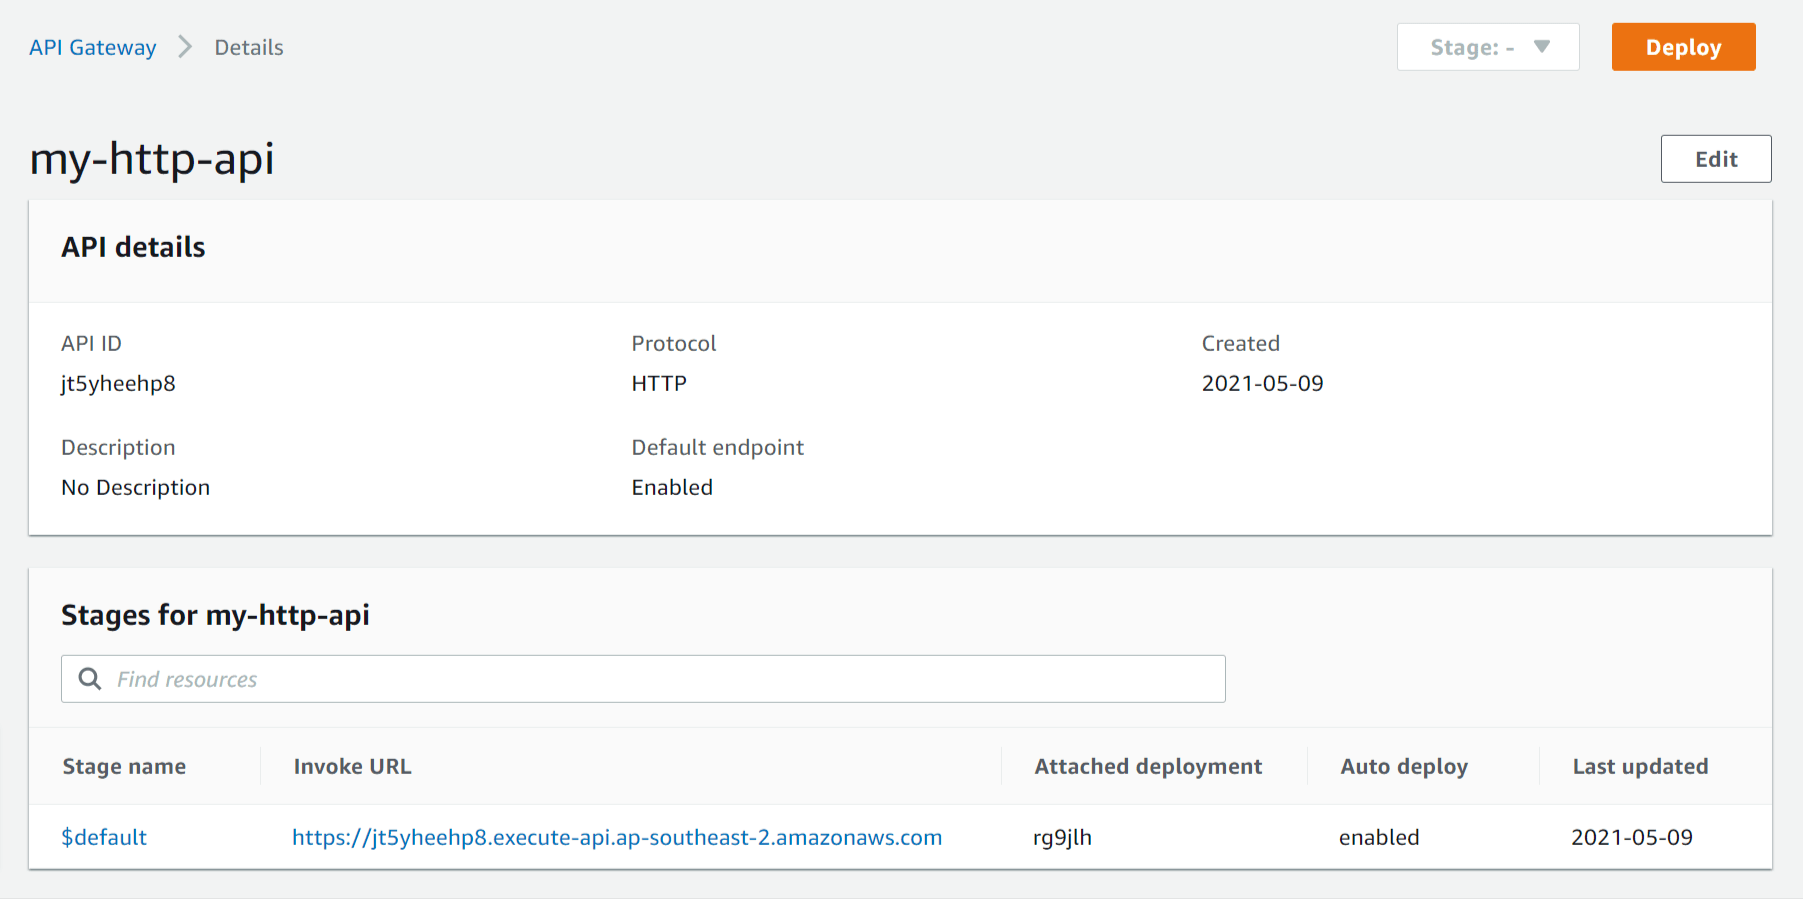
- In the AWS Console, go to the API Gateway section.
- Click the link to the HTTP API you created above (my-http-api).
- Copy the Invoke URL of the $default stage.
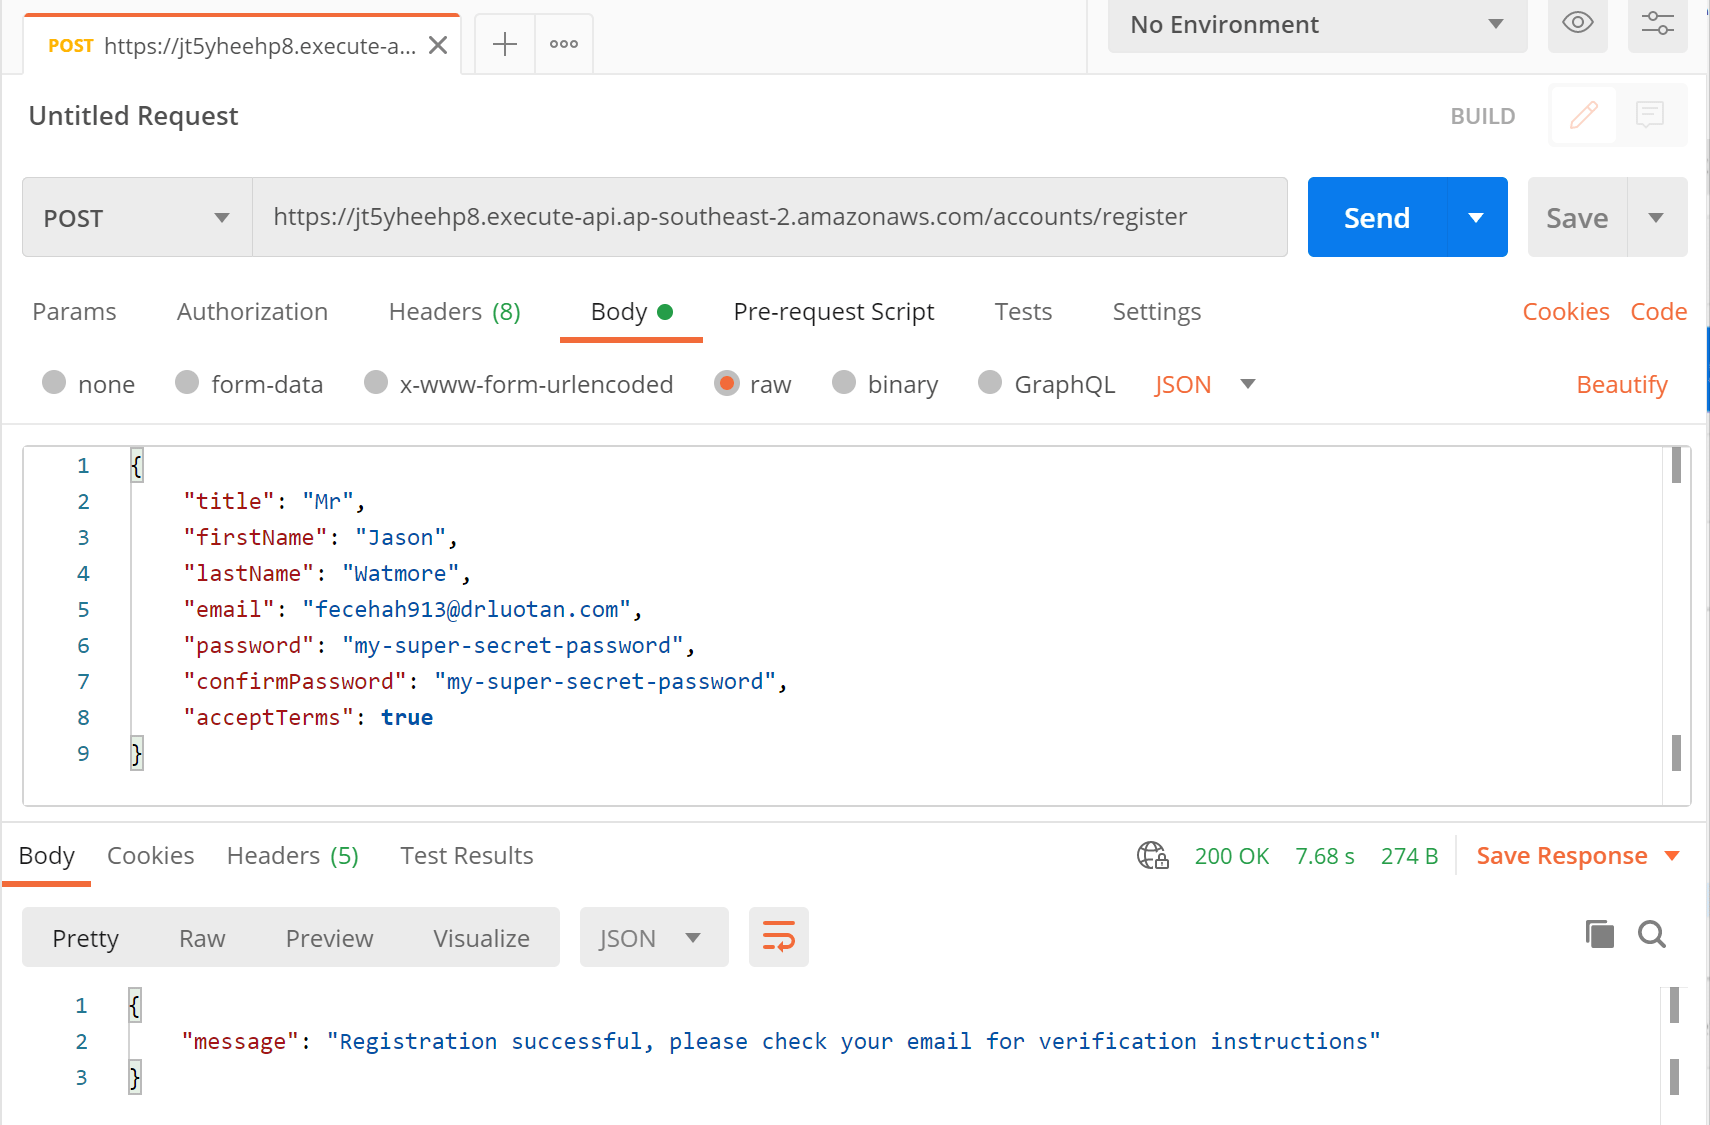
- In Postman, open a new request tab by clicking the plus (+) button at the end of the tabs.
- Change the http request method to POST with the dropdown selector on the left of the URL input field.
- In the URL field enter the address to the Invoke URL of the HTTP API with the account register route (
/accounts/register) appended to the end (e.g. https://jt5yheehp8.execute-api.ap-southeast-2.amazonaws.com/accounts/register). - Select the Body tab below the URL field, change the body type radio button to raw, and change the format dropdown selector to JSON.
- Enter a JSON object containing the required user properties in the "Body" textarea, e.g:
{ "title": "Mr", "firstName": "Jason", "lastName": "Watmore", "email": "[email protected]", "password": "my-super-secret-password", "confirmPassword": "my-super-secret-password", "acceptTerms": true } - Click the Send button, you should receive a "200 OK" response with a "registration successful" message in the response body.
Step screenshots:
HTTP API details with Invoke URL
Postman after the request is sent and the new user has been registered
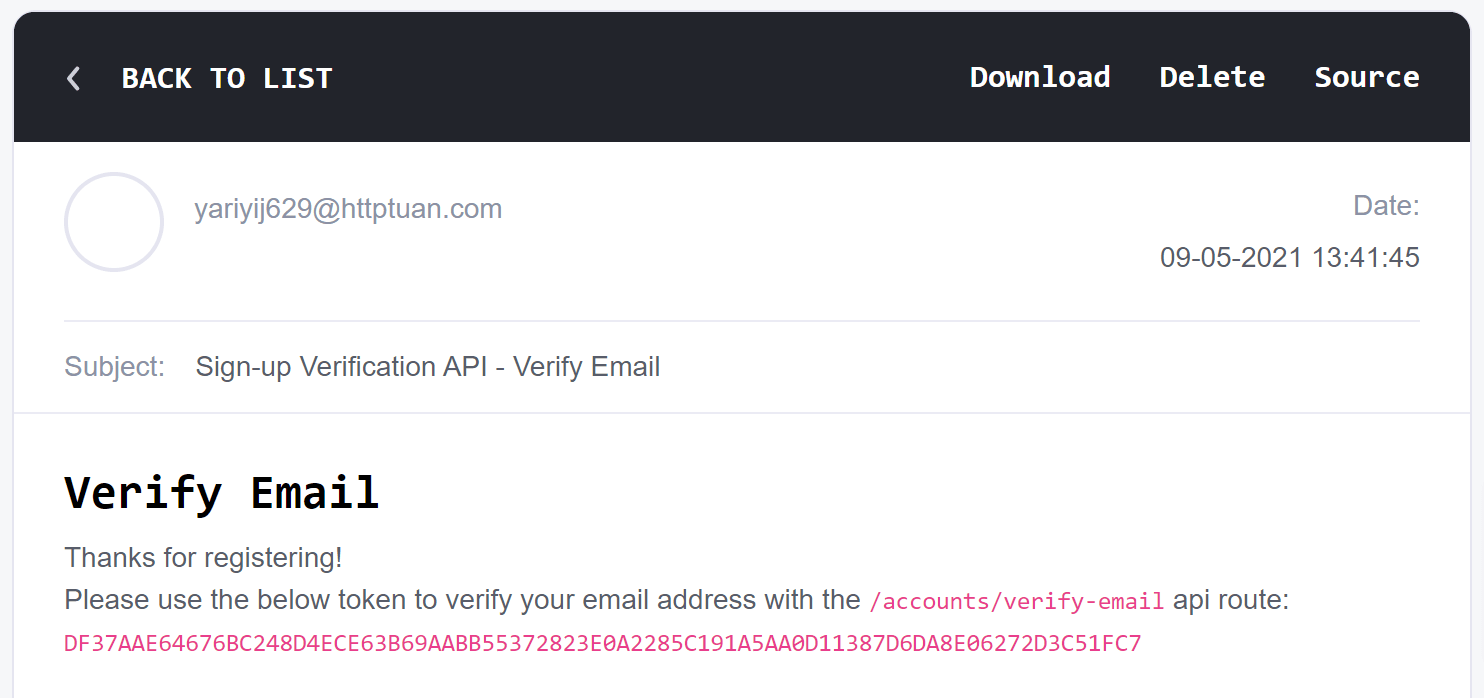
Email received with the token to verify the account
Remove everything from AWS (Clean up)
When you're finished you can remove all of the AWS resources created for the tutorial to avoid any unnecessary AWS costs.
Follow these steps to clean up the resources created in AWS:
Delete Lambda Function
- In the AWS Console, go to the Lambda Service section.
- Select the Lambda function you created above (my-dotnet-lambda) and click Actions and Delete.
- Click Delete to confirm.
Delete HTTP API
- Go to the API Gateway Service section.
- Select the HTTP API you created above (my-http-api) and click Actions and Delete.
- Click Delete to confirm.
Delete IAM Users and Roles
- Go to the IAM Service section and select Users in the left menu.
- Select the SMTP user (ses-smtp-user...) created above and click Delete User.
- Select Roles in the left menu, then select the Lambda role created above (my-lambda-execution-role) and click Delete role.
Delete SQL Server Database
- Go to the RDS Service section and select Databases in the left menu.
- Select the SQL Server database you created above (database-1) and click Actions and Delete.
- Uncheck the box next to "Create final snapshot?", check the box to acknowledge that there will no longer be backups available, then enter delete me into the confirmation text field and click Delete.
- After the database is deleted select Subnet groups in the left menu.
- Select the Subnet group created above (public-subnets) and click Delete.
Delete NAT Gateway and Elastic IP
- Go to the VPC Service section and select NAT Gateways in the left menu.
- Select the NAT gateway created above (my-nat-gateway) and click Actions and Delete NAT gateway.
- Enter delete into the confirmation text field and click Delete.
- After the NAT gateway is deleted select Elastic IP addresses in the left menu.
- Select the IP address that was allocated to the NAT gateway, click Actions and Release Elastic IP address.
Delete VPC
- Select Your VPCs in the left menu.
- Select the VPC you created at the start of the tutorial (my-vpc) and click Actions and Delete VPC.
- Enter delete into the confirmation text field and click Delete.
Need Some Deployment Help?
Search fiverr for freelance Deployment developers.
Follow me for updates
When I'm not coding...
Me and Tina are on a motorcycle adventure around Australia.
Come along for the ride!