
Node.js + MySQL - Simple API for Authentication, Registration and User Management
Tutorial built with Node.js, Sequelize and MySQL
Other versions available:
- Node: Node + MSSQL, Node + MongoDB
- .NET: .NET 6.0, 5.0, ASP.NET Core 3.1, 2.2
In this tutorial we'll go through an example Node.js + MySQL API that supports user registration, login with JWT authentication and user management.
The api is written in JavaScript for Node.js and requires MySQL to be running. The Sequelize ORM is used to connect to MySQL, define the database schema and read/write data, and Express is used as the web server for the api.
The tutorial includes example front end apps built with React, Angular and Vue that can be easily 'plugged in' to the api.
The project is available on GitHub at https://github.com/cornflourblue/node-mysql-registration-login-api.
Node + MySQL Tutorial Contents
- Run the example API locally
- Test the API with Postman
- Run with a React app
- Run with an Angular app
- Run a Vue.js app
- Node + MySQL API Project Structure
Running the Node.js + MySQL API Locally
- Install Node.js and npm from https://nodejs.org/en/download/.
- Install MySQL Community Server from https://dev.mysql.com/downloads/mysql/ and ensure it is started. Installation instructions are available at https://dev.mysql.com/doc/refman/8.0/en/installing.html.
- Download or clone the project source code from https://github.com/cornflourblue/node-mysql-registration-login-api
- Install all required npm packages by running
npm installfrom the command line in the project root folder (where the package.json is located). - Start the api by running
npm startfrom the command line in the project root folder, you should see the messageServer listening on port 4000. Follow the instructions below to test with Postman or hook up with one of the example single page applications available (React, Angular or Vue).
Before running in production
Before running in production also make sure that you update the secret property in the config.json file, it is used to sign and verify JWT tokens for authentication. Change it to a random string to ensure nobody else can generate a JWT with the same secret and gain unauthorized access to your api. A quick and easy way is join a couple of GUIDs together to make a long random string (e.g. from https://www.guidgenerator.com/).
Testing the Node Auth API with Postman
Postman is a great tool for testing APIs, you can download it at https://www.getpostman.com/.
Below are instructions on how to use Postman to register a new user with the api, authenticate a user to get a JWT token, and then make an authenticated request with the JWT token to retrieve a list of users from the api.
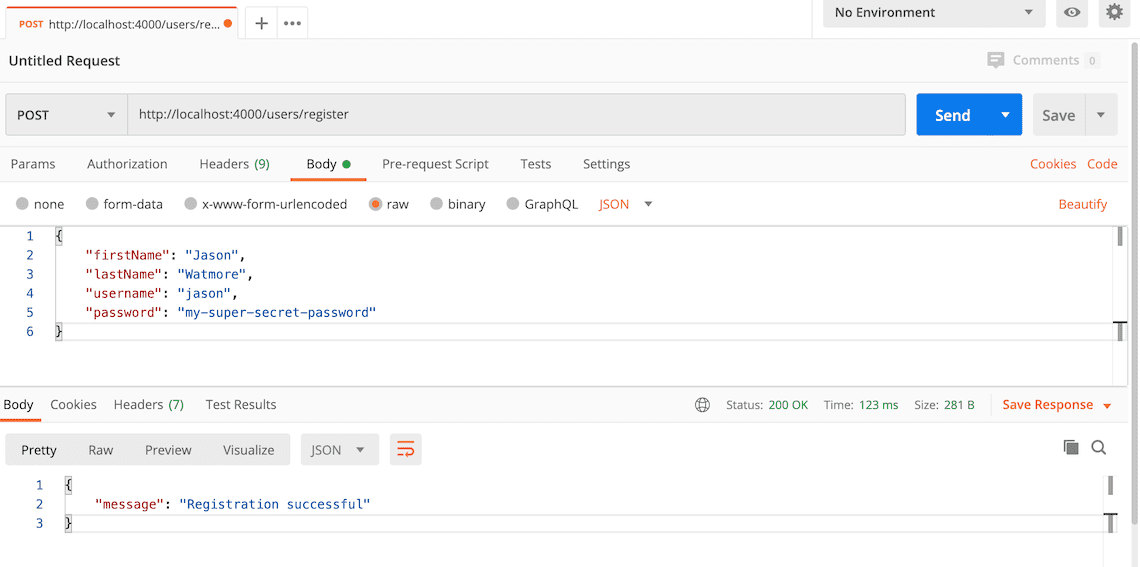
How to register a new user with Postman
To register a new user with the api follow these steps:
- Open a new request tab by clicking the plus (+) button at the end of the tabs.
- Change the http request method to "POST" with the dropdown selector on the left of the URL input field.
- In the URL field enter the address to the register route of your local API -
http://localhost:4000/users/register. - Select the "Body" tab below the URL field, change the body type radio button to "raw", and change the format dropdown selector to "JSON".
- Enter a JSON object containing the required user properties in the "Body" textarea, e.g:
{ "firstName": "Jason", "lastName": "Watmore", "username": "jason", "password": "my-super-secret-password" } - Click the "Send" button, you should receive a "200 OK" response with a success message in the response body.
Here's a screenshot of Postman after the request is sent and the new user has been registered:
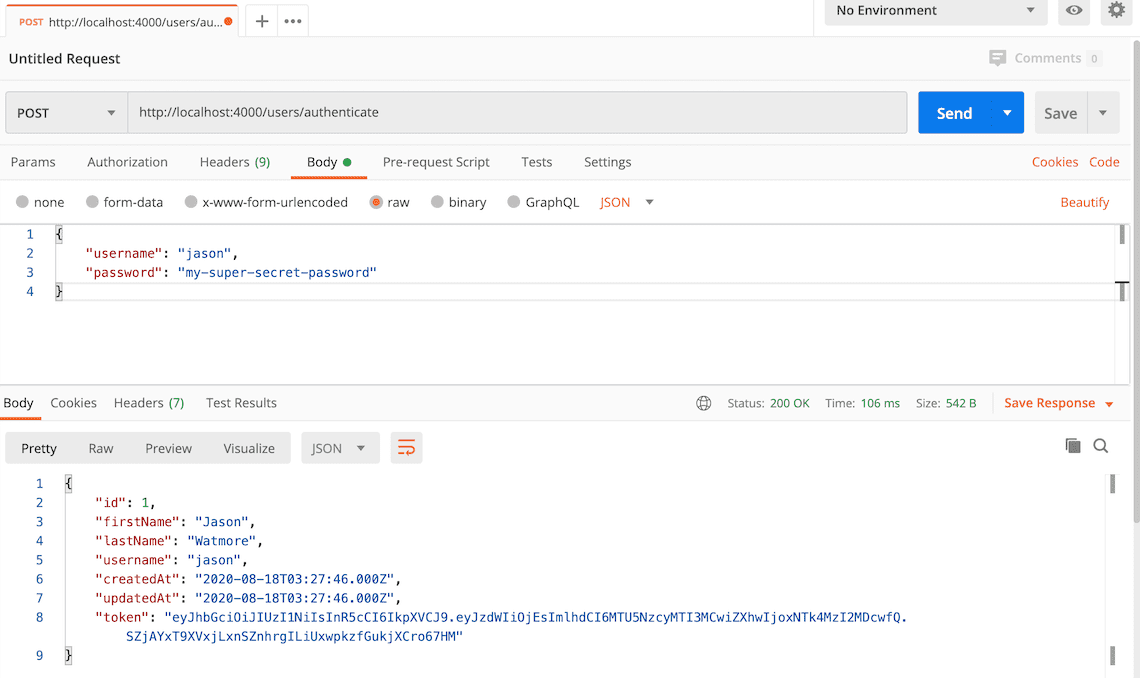
How to authenticate a user with Postman
To authenticate a user with the api and get a JWT token follow these steps:
- Open a new request tab by clicking the plus (+) button at the end of the tabs.
- Change the http request method to "POST" with the dropdown selector on the left of the URL input field.
- In the URL field enter the address to the authenticate route of your local API -
http://localhost:4000/users/authenticate. - Select the "Body" tab below the URL field, change the body type radio button to "raw", and change the format dropdown selector to "JSON".
- Enter a JSON object containing the username and password in the "Body" textarea:
{ "username": "jason", "password": "my-super-secret-password" } - Click the "Send" button, you should receive a "200 OK" response with the user details including a JWT token in the response body, make a copy of the token value because we'll be using it in the next step to make an authenticated request.
Here's a screenshot of Postman after the request is sent and the user has been authenticated:
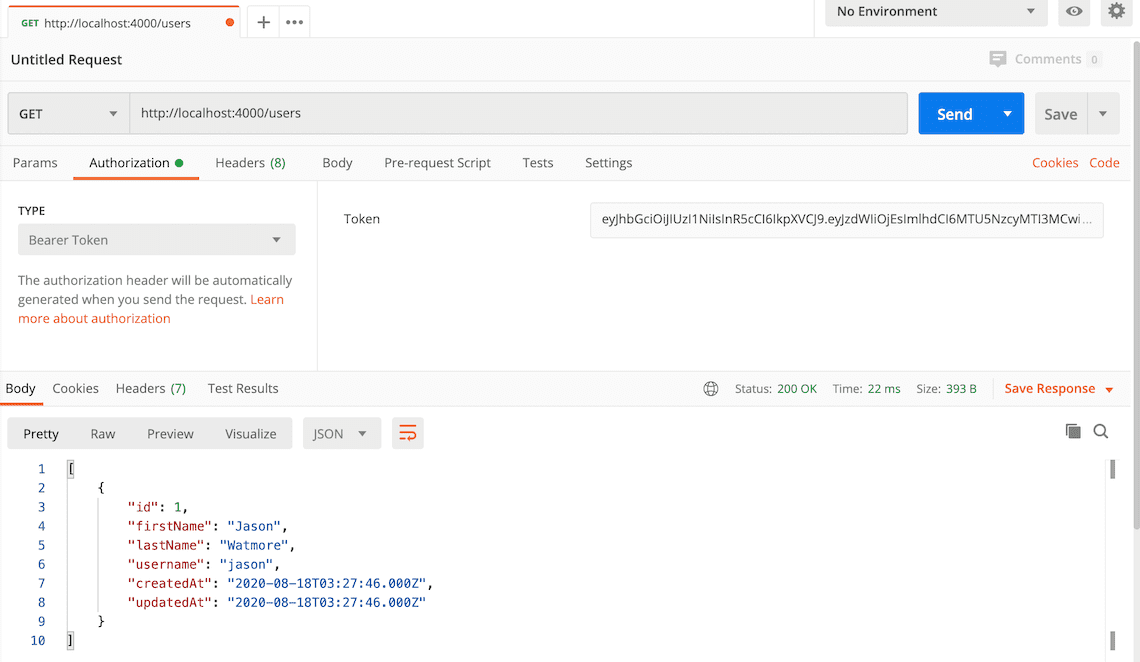
How to make an authenticated request to retrieve all users
To make an authenticated request using the JWT token from the previous step, follow these steps:
- Open a new request tab by clicking the plus (+) button at the end of the tabs.
- Change the http request method to "GET" with the dropdown selector on the left of the URL input field.
- In the URL field enter the address to the users route of your local API -
http://localhost:4000/users. - Select the "Authorization" tab below the URL field, change the type to "Bearer Token" in the type dropdown selector, and paste the JWT token from the previous authenticate step into the "Token" field.
- Click the "Send" button, you should receive a "200 OK" response containing a JSON array with all the user records in the system.
Here's a screenshot of Postman after making an authenticated request to get all users:
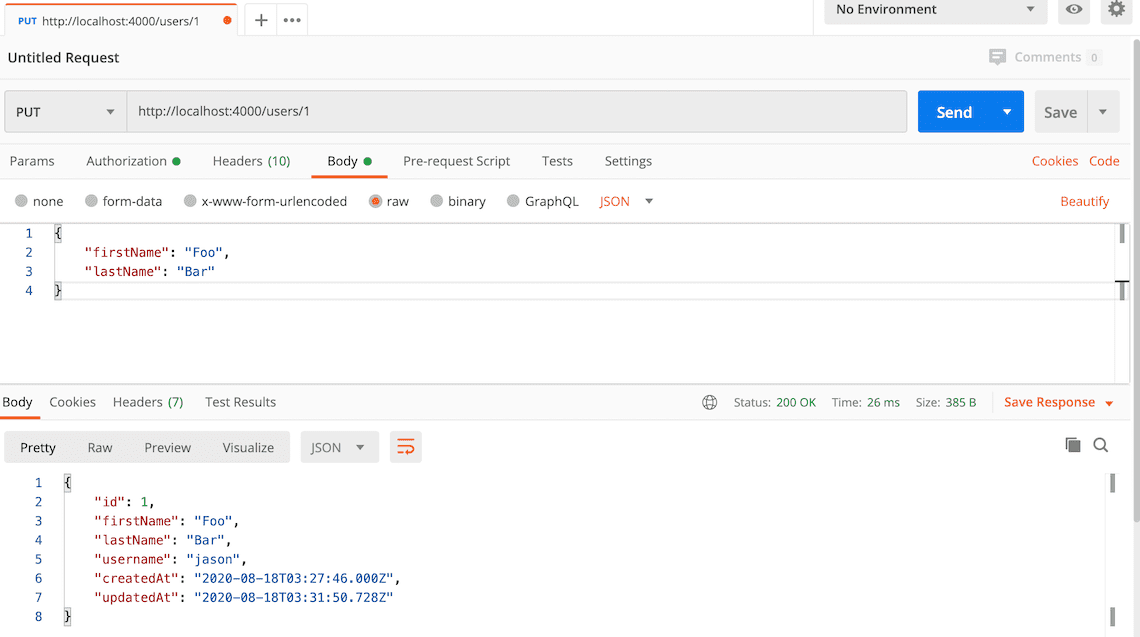
How to update a user with Postman
To update a user with the api follow these steps:
- Open a new request tab by clicking the plus (+) button at the end of the tabs.
- Change the http request method to "PUT" with the dropdown selector on the left of the URL input field.
- In the URL field enter the address to the
/users/{id}route with the id of the user you registered above, e.g -http://localhost:4000/users/1. - Select the "Authorization" tab below the URL field, change the type to "Bearer Token" in the type dropdown selector, and paste the JWT token from the previous authenticate step into the "Token" field.
- Select the "Body" tab below the URL field, change the body type radio button to "raw", and change the format dropdown selector to "JSON".
- Enter a JSON object in the "Body" textarea containing the properties you want to update, for example to update the first and last names:
{ "firstName": "Foo", "lastName": "Bar" } - Click the "Send" button, you should receive a "200 OK" response with the updated user details in the response body.
Here's a screenshot of Postman after the request is sent and the user has been updated:
Running a React client app with the Node.js API
For full details about the example React application see the post React Hooks + Redux - User Registration and Login Tutorial & Example. But to get up and running quickly just follow the below steps.
- Download or clone the React tutorial code from https://github.com/cornflourblue/react-hooks-redux-registration-login-example
- Install all required npm packages by running
npm installfrom the command line in the project root folder (where the package.json is located). - Remove or comment out the 2 lines below the comment
// setup fake backendlocated in the/src/index.jsxfile. - Start the application by running
npm startfrom the command line in the project root folder, this will launch a browser displaying the application and it should be hooked up with the Node.js + MySQL API that you already have running.
Running an Angular 10 client app with the Node.js API
For full details about the example Angular 10 application see the post Angular 10 - User Registration and Login Example & Tutorial. But to get up and running quickly just follow the below steps.
- Download or clone the Angular 10 tutorial code from https://github.com/cornflourblue/angular-10-registration-login-example
- Install all required npm packages by running
npm installfrom the command line in the project root folder (where the package.json is located). - Remove or comment out the line below the comment
// provider used to create fake backendlocated in the/src/app/app.module.tsfile. - Start the application by running
npm startfrom the command line in the project root folder, this will launch a browser displaying the application and it should be hooked up with the Node.js + MySQL API that you already have running.
Running a Vue.js client app with the Node.js API
For full details about the example Vue application see the post Vue + Vuex - User Registration and Login Tutorial & Example. But to get up and running quickly just follow the below steps.
- Download or clone the Vue tutorial code from https://github.com/cornflourblue/vue-vuex-registration-login-example
- Install all required npm packages by running
npm installfrom the command line in the project root folder (where the package.json is located). - Remove or comment out the 2 lines below the comment
// setup fake backendlocated in the/src/index.jsfile. - Start the application by running
npm startfrom the command line in the project root folder, this will launch a browser displaying the application and it should be hooked up with the Node.js + MySQL API that you already have running.
Node + MySQL API Project Structure
The tutorial project is structured into feature folders (users) and non-feature / shared component folders (_helpers, _middleware). Shared component folders contain code that can be used by multiple features and other parts of the application, and are prefixed with an underscore _ to group them together and make it easy to differentiate between feature folders and non-feature folders.
The example only contains a single (users) feature at the moment, but can be easily extended with other features by copying the users folder and following the same pattern.
Helpers Folder
The helpers folder contains all the bits and pieces that don't fit into other folders but don't justify having a folder of their own.
MySQL Database Wrapper
The MySQL database wrapper connects to MySQL using Sequelize and the MySQL2 client, and exports an object containing all of the database model objects in the application (currently only User). It provides an easy way to access any part of the database from a single point.
The initialize() function is executed once on api startup and performs the following actions:
- Connects to MySQL server using the
mysql2db client and executes a query to create the database if it doesn't already exist. - Connects to the database with the Sequelize ORM.
- Initializes the
Usermodel and attaches it to the exporteddbobject. - Automatically creates tables in MySQL database if they don't exist by calling
await sequelize.sync(). For more info on Sequelize model synchronization options see https://sequelize.org/master/manual/model-basics.html#model-synchronization.
const config = require('config.json');
const mysql = require('mysql2/promise');
const { Sequelize } = require('sequelize');

module.exports = db = {};

initialize();

async function initialize() {
    // create db if it doesn't already exist
    const { host, port, user, password, database } = config.database;
    const connection = await mysql.createConnection({ host, port, user, password });
    await connection.query(`CREATE DATABASE IF NOT EXISTS \`${database}\`;`);

    // connect to db
    const sequelize = new Sequelize(database, user, password, { dialect: 'mysql' });

    // init models and add them to the exported db object
    db.User = require('../users/user.model')(sequelize);

    // sync all models with database
    await sequelize.sync();
}
Express.js Middleware Folder
The middleware folder contains Express.js middleware functions that can be used by different routes / features within the application.
Authorize Middleware
The authorize middleware can be added to any route to restrict access to the route to authenticated users. It is used by the users controller to restrict access to user CRUD routes.
The authorize function returns an array containing two middleware functions:
- The first (
jwt({ ... })) authenticates the request by validating the JWT access token in the "Authorization" header of the http request. On successful authentication auserobject is attached to thereqobject that contains the data from the JWT token, which in this example includes the user id in the token subject ('sub') property. - The second authorizes the request by checking that the authenticated user still exists, and attaches the user object to the request so it can be accessed by controller functions.
If either authentication or authorization fails then a 401 Unauthorized response is returned.
const jwt = require('express-jwt');
const { secret } = require('config.json');
const db = require('_helpers/db');

module.exports = authorize;

function authorize() {
    return [
        // authenticate JWT token and attach decoded token to request as req.user
        jwt({ secret, algorithms: ['HS256'] }),

        // attach full user record to request object
        async (req, res, next) => {
            // get user with id from token 'sub' (subject) property
            const user = await db.User.findByPk(req.user.sub);

            // check user still exists
            if (!user)
                return res.status(401).json({ message: 'Unauthorized' });

            // authorization successful
            req.user = user.get();
            next();
        }
    ];
}
Global Error Handler Middleware
The global error handler is used catch all errors and remove the need for duplicated error handling code throughout the application. It's configured as middleware in the main server.js file.
By convention errors of type 'string' are treated as custom (app specific) errors, this simplifies the code for throwing custom errors since only a string needs to be thrown (e.g. throw 'Invalid token'). Further to this if a custom error ends with the words 'not found' a 404 response code is returned, otherwise a standard 400 response is returned. See the user service for some examples of custom errors thrown by the api, errors are caught in the users controller for each route and passed to next(err) which passes them to this global error handler.
module.exports = errorHandler;

function errorHandler(err, req, res, next) {
    switch (true) {
        case typeof err === 'string':
            // custom application error
            const is404 = err.toLowerCase().endsWith('not found');
            const statusCode = is404 ? 404 : 400;
            return res.status(statusCode).json({ message: err });
        case err.name === 'UnauthorizedError':
            // jwt authentication error
            return res.status(401).json({ message: 'Unauthorized' });
        default:
            return res.status(500).json({ message: err.message });
    }
}
Validate Request Middleware
The validate request middleware function validates the body of a request against a Joi schema object.
It used by schema middleware functions in controllers to validate the request against the schema for a specific route (e.g. authenticateSchema in the users controller).
module.exports = validateRequest;

function validateRequest(req, next, schema) {
    const options = {
        abortEarly: false, // include all errors
        allowUnknown: true, // ignore unknown props
        stripUnknown: true // remove unknown props
    };
    const { error, value } = schema.validate(req.body, options);
    if (error) {
        next(`Validation error: ${error.details.map(x => x.message).join(', ')}`);
    } else {
        req.body = value;
        next();
    }
}
Users Folder
The users folder contains all code that is specific to the users feature of the api.
Sequelize User Model
The user model uses Sequelize to define the schema for the Users table in the MySQL database. The exported Sequelize model object gives full access to perform CRUD (create, read, update, delete) operations on users in MySQL, see the user service below for examples of it being used (via the db helper).
The defaultScope configures the model to exclude the password hash from query results by default. The withHash scope can be used to query users and include the password hash field in results.
const { DataTypes } = require('sequelize');

module.exports = model;

function model(sequelize) {
    const attributes = {
        firstName: { type: DataTypes.STRING, allowNull: false },
        lastName: { type: DataTypes.STRING, allowNull: false },
        username: { type: DataTypes.STRING, allowNull: false },
        hash: { type: DataTypes.STRING, allowNull: false }
    };

    const options = {
        defaultScope: {
            // exclude hash by default
            attributes: { exclude: ['hash'] }
        },
        scopes: {
            // include hash with this scope
            withHash: { attributes: {}, }
        }
    };

    return sequelize.define('User', attributes, options);
}
User Service
The user service contains the core business logic for user authentication and management in the node api, it encapsulates all interaction with the sequelize user model and exposes a simple set of methods which are used by the users controller.
The top of the file contains the exported service object with just the method names to make it easy to see all the methods at a glance, the rest of the file contains the implementation functions for each service method, followed by local helper functions.
const config = require('config.json');
const jwt = require('jsonwebtoken');
const bcrypt = require('bcryptjs');
const db = require('_helpers/db');

module.exports = {
    authenticate,
    getAll,
    getById,
    create,
    update,
    delete: _delete
};

async function authenticate({ username, password }) {
    const user = await db.User.scope('withHash').findOne({ where: { username } });

    if (!user || !(await bcrypt.compare(password, user.hash)))
        throw 'Username or password is incorrect';

    // authentication successful
    const token = jwt.sign({ sub: user.id }, config.secret, { expiresIn: '7d' });
    return { ...omitHash(user.get()), token };
}

async function getAll() {
    return await db.User.findAll();
}

async function getById(id) {
    return await getUser(id);
}

async function create(params) {
    // validate
    if (await db.User.findOne({ where: { username: params.username } })) {
        throw 'Username "' + params.username + '" is already taken';
    }

    // hash password
    if (params.password) {
        params.hash = await bcrypt.hash(params.password, 10);
    }

    // save user
    await db.User.create(params);
}

async function update(id, params) {
    const user = await getUser(id);

    // validate
    const usernameChanged = params.username && user.username !== params.username;
    if (usernameChanged && await db.User.findOne({ where: { username: params.username } })) {
        throw 'Username "' + params.username + '" is already taken';
    }

    // hash password if it was entered
    if (params.password) {
        params.hash = await bcrypt.hash(params.password, 10);
    }

    // copy params to user and save
    Object.assign(user, params);
    await user.save();

    return omitHash(user.get());
}

async function _delete(id) {
    const user = await getUser(id);
    await user.destroy();
}

// helper functions

async function getUser(id) {
    const user = await db.User.findByPk(id);
    if (!user) throw 'User not found';
    return user;
}

function omitHash(user) {
    const { hash, ...userWithoutHash } = user;
    return userWithoutHash;
}
Express.js Users Controller
The users controller defines all /users routes for the api, the route definitions are grouped together at the top of the file and the implementation functions are below. The controller is bound to the /users path in the main server.js file.
Routes that require authorization include the middleware function authorize(), the auth logic is located in the authorize middleware.
Routes that require schema validation include a middleware function with the naming convention <route>Schema (e.g. authenticateSchema). Each schema validation function defines a schema for the request body using the Joi library and calls validateRequest(req, next, schema) to ensure the request body is valid. If validation succeeds the request continues to the next middleware function (the route function), otherwise an error is returned with details of why validation failed. For more info about Joi schema validation see https://www.npmjs.com/package/joi.
Express is the web server used by the api, it's one of the most popular web application frameworks for Node.js. For more info see https://expressjs.com/.
const express = require('express');
const router = express.Router();
const Joi = require('joi');
const validateRequest = require('_middleware/validate-request');
const authorize = require('_middleware/authorize')
const userService = require('./user.service');

// routes
router.post('/authenticate', authenticateSchema, authenticate);
router.post('/register', registerSchema, register);
router.get('/', authorize(), getAll);
router.get('/current', authorize(), getCurrent);
router.get('/:id', authorize(), getById);
router.put('/:id', authorize(), updateSchema, update);
router.delete('/:id', authorize(), _delete);

module.exports = router;

function authenticateSchema(req, res, next) {
    const schema = Joi.object({
        username: Joi.string().required(),
        password: Joi.string().required()
    });
    validateRequest(req, next, schema);
}

function authenticate(req, res, next) {
    userService.authenticate(req.body)
        .then(user => res.json(user))
        .catch(next);
}

function registerSchema(req, res, next) {
    const schema = Joi.object({
        firstName: Joi.string().required(),
        lastName: Joi.string().required(),
        username: Joi.string().required(),
        password: Joi.string().min(6).required()
    });
    validateRequest(req, next, schema);
}

function register(req, res, next) {
    userService.create(req.body)
        .then(() => res.json({ message: 'Registration successful' }))
        .catch(next);
}

function getAll(req, res, next) {
    userService.getAll()
        .then(users => res.json(users))
        .catch(next);
}

function getCurrent(req, res, next) {
    res.json(req.user);
}

function getById(req, res, next) {
    userService.getById(req.params.id)
        .then(user => res.json(user))
        .catch(next);
}

function updateSchema(req, res, next) {
    const schema = Joi.object({
        firstName: Joi.string().empty(''),
        lastName: Joi.string().empty(''),
        username: Joi.string().empty(''),
        password: Joi.string().min(6).empty('')
    });
    validateRequest(req, next, schema);
}

function update(req, res, next) {
    userService.update(req.params.id, req.body)
        .then(user => res.json(user))
        .catch(next);
}

function _delete(req, res, next) {
    userService.delete(req.params.id)
        .then(() => res.json({ message: 'User deleted successfully' }))
        .catch(next);
}
Api Config
The api config file contains configuration data for the api, it includes database connection options for the MySQL database, and the secret used for signing and verifying JWT tokens.
IMPORTANT: The secret property is used to sign and verify JWT tokens for authentication, change it with your own random string to ensure nobody else can generate a JWT with the same secret to gain unauthorized access to your api. A quick and easy way is join a couple of GUIDs together to make a long random string (e.g. from https://www.guidgenerator.com/).
{
    "database": {
        "host": "localhost",
        "port": 3306,
        "user": "root",
        "password": "",
        "database": "node-mysql-registration-login-api"
    },
    "secret": "THIS IS USED TO SIGN AND VERIFY JWT TOKENS, REPLACE IT WITH YOUR OWN SECRET, IT CAN BE ANY STRING"
}
Package.json
The package.json file contains project configuration information including package dependencies which get installed when you run npm install.
The scripts section contains scripts that are executed by running the command npm run <script name>, the start script can also be run with the shortcut command npm start.
The start script starts the api normally using node, and the start:dev script starts the api in development mode using nodemon which automatically restarts the server when a file is changed (hot reloading).
For more info see https://docs.npmjs.com/files/package.json.
{
    "name": "node-mysql-registration-login-api",
    "version": "1.0.0",
    "description": "Node.js + MySQL API for User Management, Authentication and Registration",
    "license": "MIT",
    "repository": {
        "type": "git",
        "url": "https://github.com/cornflourblue/node-mysql-registration-login-api.git"
    },
    "scripts": {
        "start": "node ./server.js",
        "start:dev": "nodemon ./server.js"
    },
    "dependencies": {
        "bcryptjs": "^2.4.3",
        "body-parser": "^1.19.0",
        "cors": "^2.8.5",
        "express": "^4.17.1",
        "express-jwt": "^6.0.0",
        "joi": "^17.2.0",
        "jsonwebtoken": "^8.5.1",
        "mysql2": "^2.1.0",
        "rootpath": "^0.1.2",
        "sequelize": "^6.3.4"
    },
    "devDependencies": {
        "nodemon": "^2.0.4"
    }
}
Server Startup File
The server.js file is the entry point into the Node + MySQL api, it configures application middleware, binds controllers to routes and starts the Express web server for the api.
require('rootpath')();
const express = require('express');
const app = express();
const cors = require('cors');
const bodyParser = require('body-parser');
const errorHandler = require('_middleware/error-handler');

app.use(bodyParser.urlencoded({ extended: false }));
app.use(bodyParser.json());
app.use(cors());

// api routes
app.use('/users', require('./users/users.controller'));

// global error handler
app.use(errorHandler);

// start server
const port = process.env.NODE_ENV === 'production' ? (process.env.PORT || 80) : 4000;
app.listen(port, () => console.log('Server listening on port ' + port));
Need Some NodeJS Help?
Search fiverr for freelance NodeJS developers.
Follow me for updates
When I'm not coding...
Me and Tina are on a motorcycle adventure around Australia.
Come along for the ride!