
Deploy to Heroku - Node + Mongo API for Authentication, Registration and User Management
This is a quick tutorial to go through the steps required to deploy this Node.js + MongoDB Authentication API to the Heroku Cloud and test the API with Postman.
The tutorial assumes that you already have a Heroku Account, Node.js and npm installed locally, and the Heroku CLI installed locally. If you're missing any of these pieces I recommend the Getting Started on Heroku with Node.js tutorial on the Heroku docs website.
Steps to Deploy Node.js + MongoDB API to Heroku
- Clone the Node.js + MongoDB API Project from GitHub
- Create Heroku App
- Install the mLab MongoDB Add-on
- Deploy the Node.js + MongoDB API to Heroku
- Test the Node.js + MongoDB API on Heroku with Postman
Clone the Node.js + MongoDB API Project from GitHub
Clone the project source code from GitHub and cd into the project directory with the below commands.
git clone [email protected]:cornflourblue/node-mongo-registration-login-api.git

cd node-mongo-registration-login-api
Create Heroku App
Create a new app on Heroku with the below Heroku CLI command, it also links the project git repository with Heroku so we can deploy later by doing a git push to the heroku remote repository.
heroku create
You should see output similar to the below containing a randomly generated app name and url for your app. Make a not of the app url (the url ending in .herokuapp.com) because we'll use it for testing later on.
$ heroku create
Creating app... done, ⬢ floating-savannah-96225
https://floating-savannah-96225.herokuapp.com/ | https://git.heroku.com/floating-savannah-96225.git
Install the mLab MongoDB Add-on
Run the below command to install the mLab MongoDB add-on to the new Heroku app, this is a cloud-hosted MongoDB service that provides the MongoDB database used by the Node.js API.
heroku addons:create mongolab:sandbox
It installs the add-on with the "Sandbox" plan which is free, for more information about the MongoDB add-on and other plans see the add-on details page on the Heroku website.
The output should be similar to this:
$ heroku addons:create mongolab:sandbox
Creating mongolab:sandbox on ⬢ floating-savannah-96225... free
Welcome to mLab.  Your new subscription is being created and will be available shortly.  Please consult the mLab Add-on Admin UI to check on its progress.
Created mongolab-amorphous-54107 as MONGODB_URI
Use heroku addons:docs mongolab to view documentation
Deploy the Node.js + MongoDB API to Heroku
The following command deploys the Node.js + MongoDB API to Heroku by pushing our project code with git to the heroku remote repository.
git push heroku master
The output should be similar to this:
$ git push heroku master
Counting objects: 50, done.
Delta compression using up to 8 threads.
Compressing objects: 100% (31/31), done.
Writing objects: 100% (50/50), 33.48 KiB | 33.48 MiB/s, done.
Total 50 (delta 19), reused 50 (delta 19)
remote: Compressing source files... done.
remote: Building source:
remote:
remote: -----> Node.js app detected
remote:
remote: -----> Creating runtime environment
remote:
remote:        NPM_CONFIG_LOGLEVEL=error
remote:        NODE_ENV=production
remote:        NODE_MODULES_CACHE=true
remote:        NODE_VERBOSE=false
remote:
remote: -----> Installing binaries
remote:        engines.node (package.json):  unspecified
remote:        engines.npm (package.json):   unspecified (use default)
remote:
remote:        Resolving node version 10.x...
remote:        Downloading and installing node 10.14.1...
remote:        Using default npm version: 6.4.1
remote:
remote: -----> Building dependencies
remote:        Installing node modules (package.json + package-lock)
remote:
remote:        > [email protected] postinstall /tmp/build_9e37f14285eebd8778bc126202499983/node_modules/nodemon
remote:        > node bin/postinstall || exit 0
remote:
remote:        Love nodemon? You can now support the project via the open collective:
remote:         > https://opencollective.com/nodemon/donate
remote:
remote:        added 326 packages from 203 contributors and audited 1583 packages in 7.603s
remote:        found 0 vulnerabilities
remote:
remote:
remote: -----> Caching build
remote:        - node_modules
remote:
remote: -----> Pruning devDependencies
remote:        removed 226 packages and audited 221 packages in 3.023s
remote:        found 0 vulnerabilities
remote:
remote:
remote: -----> Build succeeded!
remote: -----> Discovering process types
remote:        Procfile declares types     -> (none)
remote:        Default types for buildpack -> web
remote:
remote: -----> Compressing...
remote:        Done: 20.5M
remote: -----> Launching...
remote:        Released v5
remote:        https://floating-savannah-96225.herokuapp.com/ deployed to Heroku
remote:
remote: Verifying deploy... done.
To https://git.heroku.com/floating-savannah-96225.git
 * [new branch]      master -> master
Testing the Node.js + MongoDB API on Heroku with Postman
Postman is a great tool for testing APIs, you can download it at https://www.getpostman.com/.
Below are instructions for using Postman to test your new Node.js + MongoDB API on Heroku. First you'll register a new user, then authenticate that user to get a JWT token, and finally make an authenticated request to retrieve a list of all users in the system.
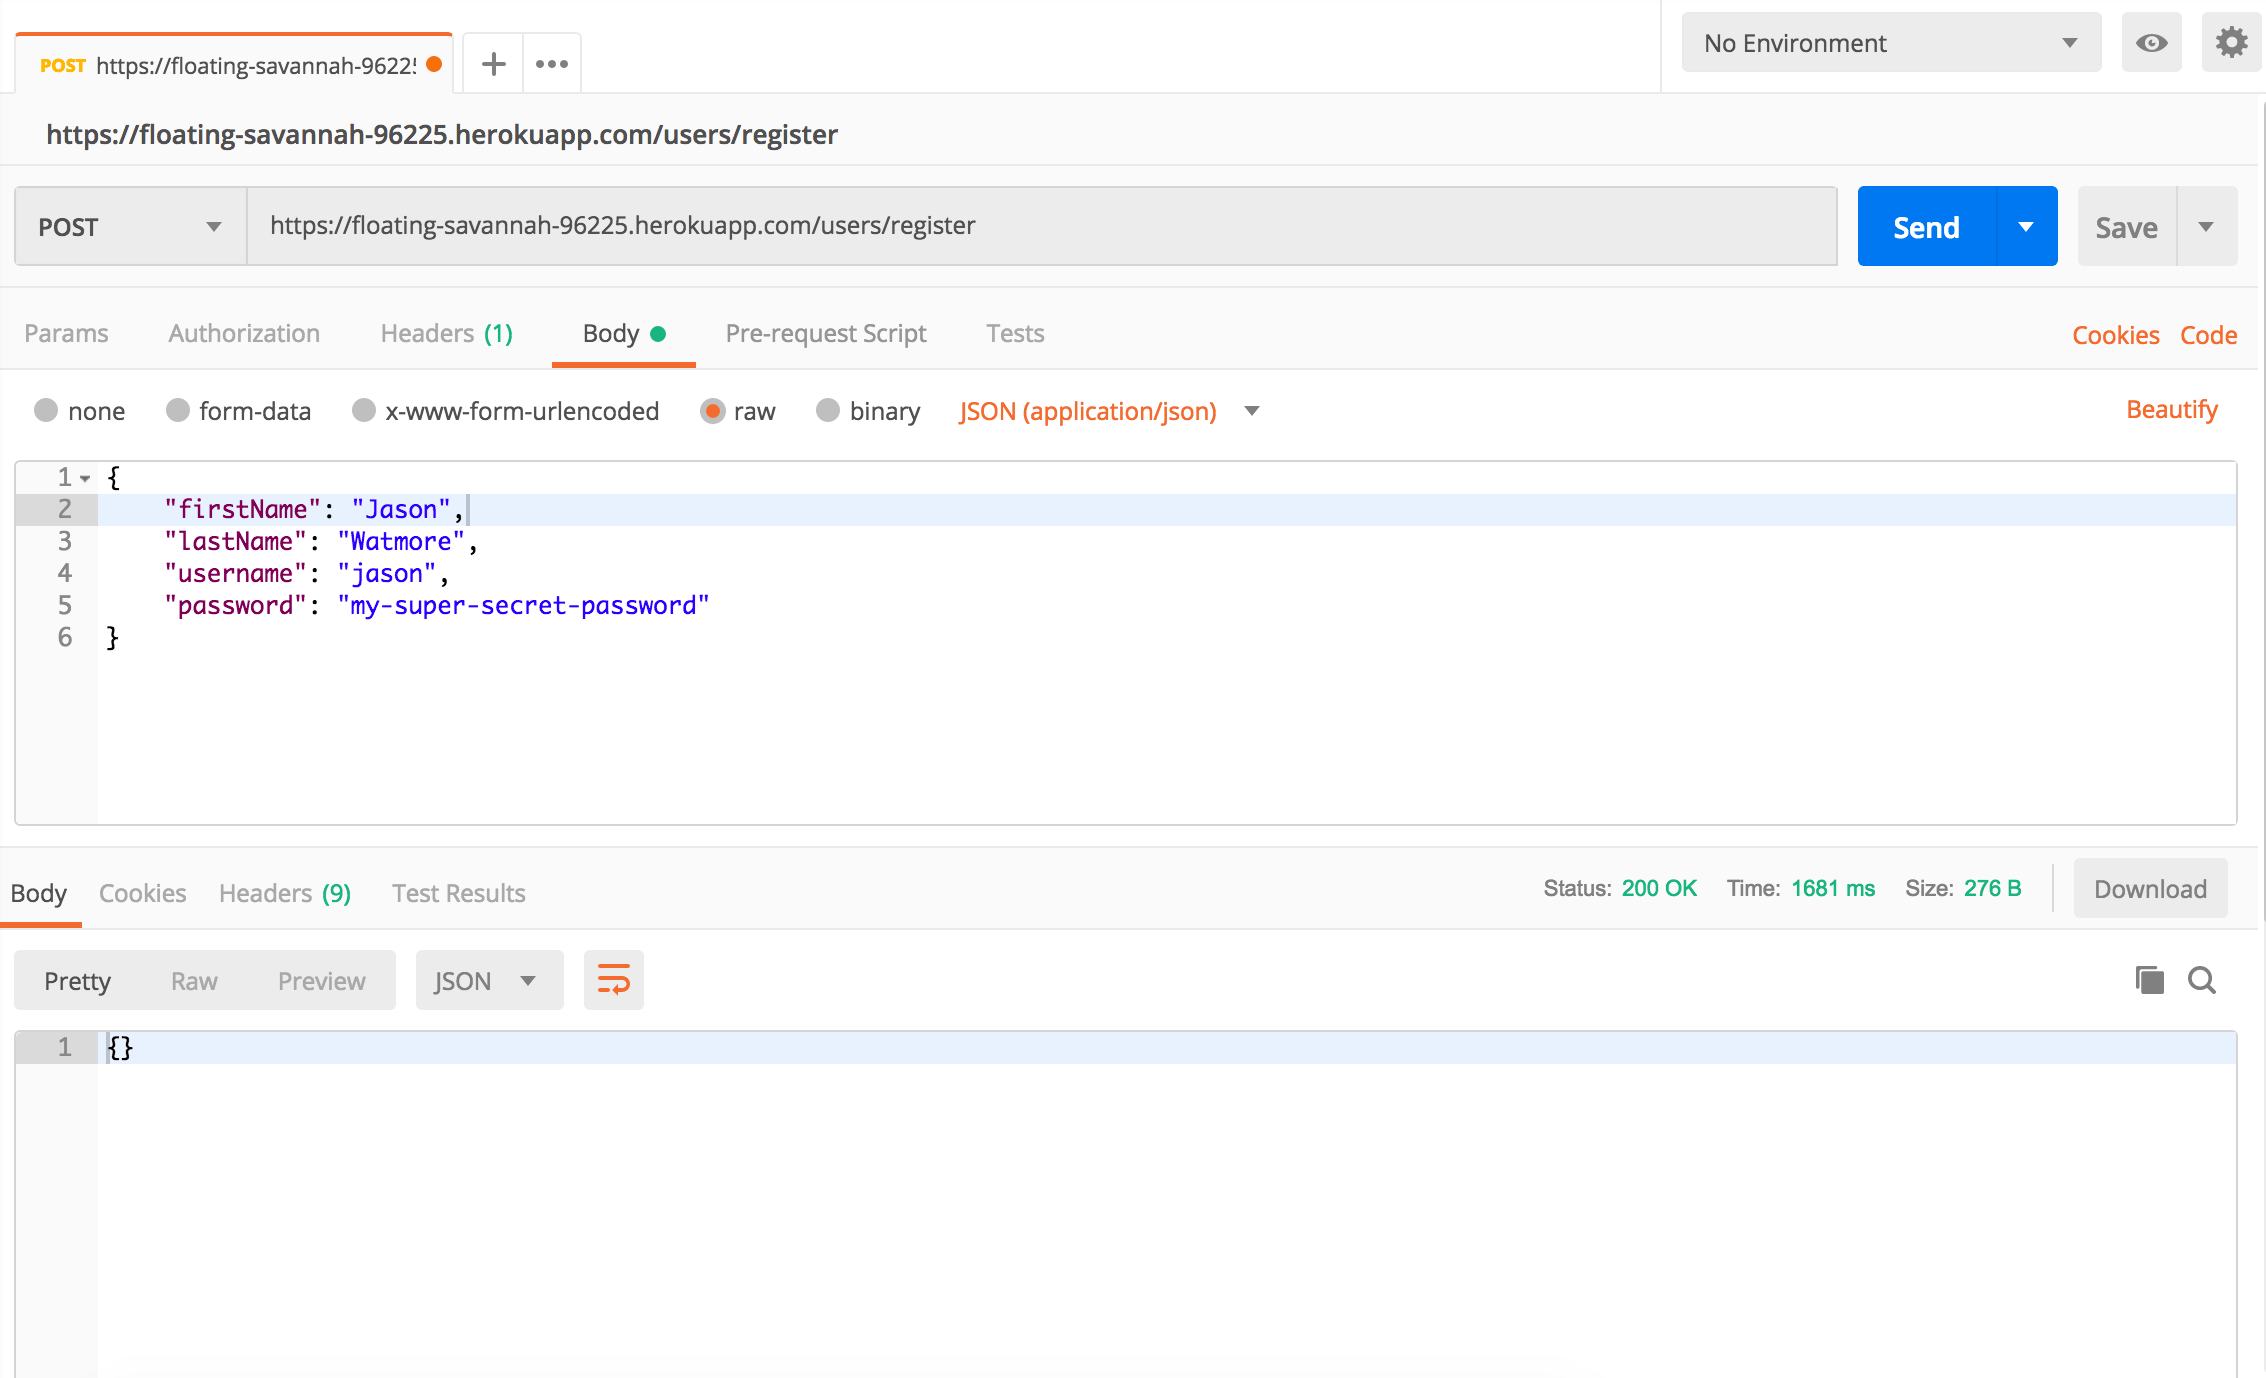
Register a new user
To register a new user open Postman and follow these steps:
- Open a new request tab by clicking the plus (+) button at the end of the tabs.
- Change the http request method to "POST" with the dropdown selector on the left of the URL input field.
- In the URL field enter the address to your API on Heroku with the register path (
/users/register) added to the end, e.g.https://floating-savannah-96225.herokuapp.com/users/register. - Select the "Body" tab below the URL field, change the body type radio button to "raw", and change the format dropdown selector to "JSON (application/json)".
- Enter a JSON object containing the required user properties in the Body textarea, e.g.
{ "firstName": "Jason", "lastName": "Watmore", "username": "jason", "password": "my-super-secret-password" } - Click the "Send" button, you should receive a "200 OK" response with an empty JSON object in the response body.
Here's a screenshot of Postman after the request is sent and the user is registered.
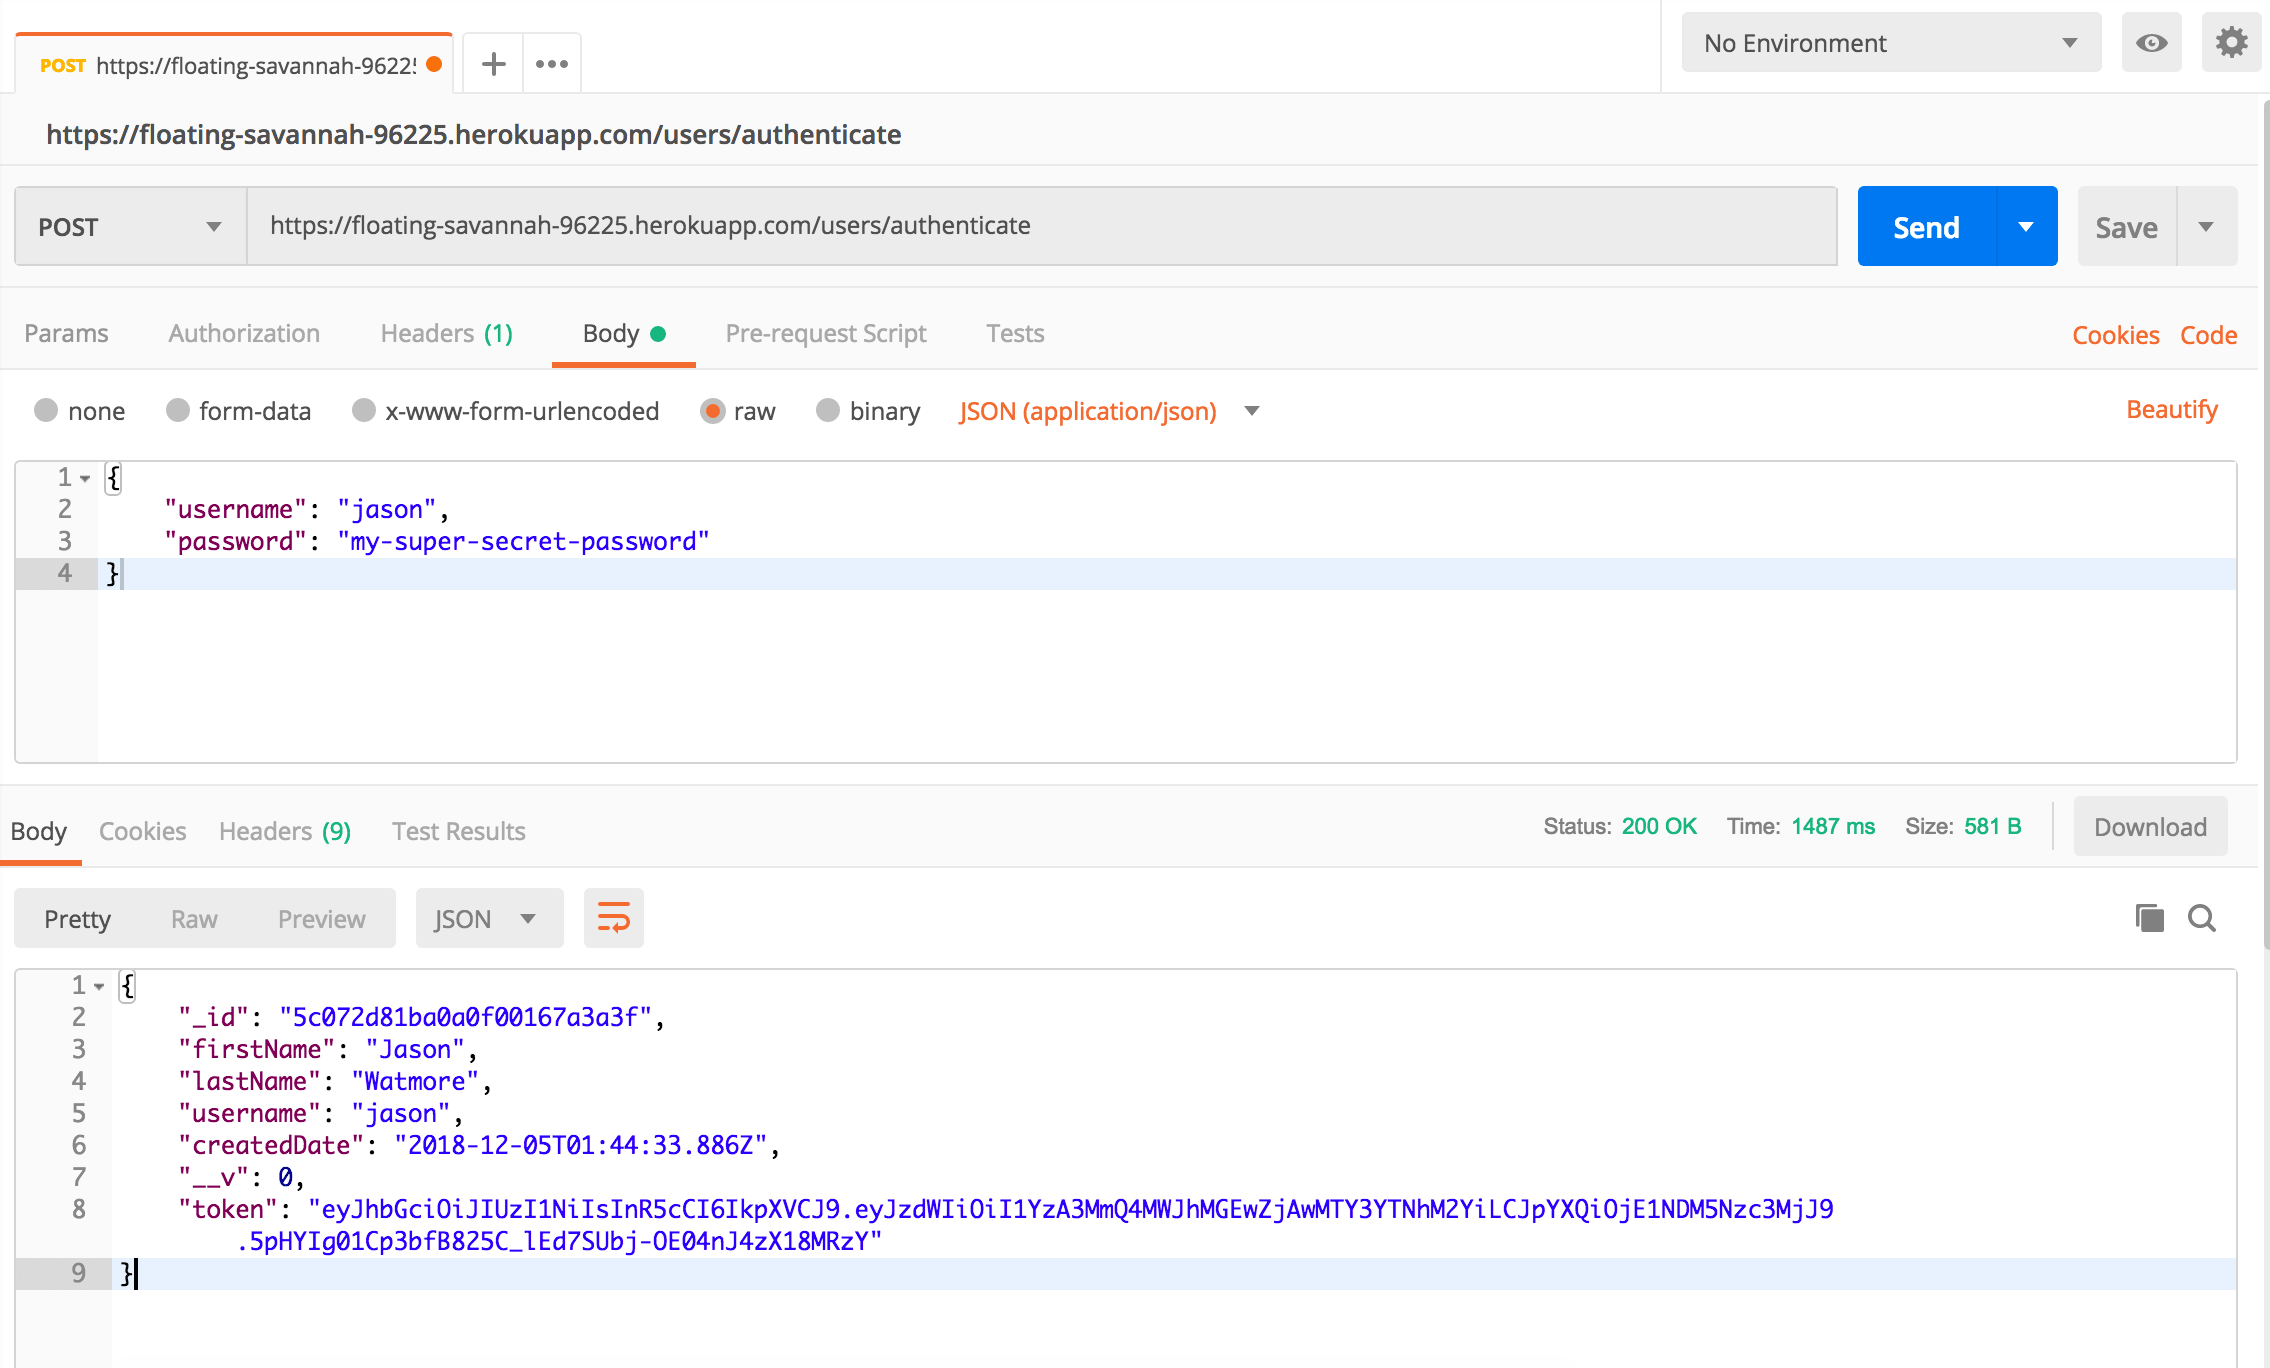
Authenticate a user
To authenticate a user and get a JWT token follow these steps:
- Open a new request tab by clicking the plus (+) button at the end of the tabs.
- Change the http request method to "POST" with the dropdown selector on the left of the URL input field.
- In the URL field enter the address to your API on Heroku with the authenticate path (
/users/authenticate) added to the end, e.g.https://floating-savannah-96225.herokuapp.com/users/authenticate. - Select the "Body" tab below the URL field, change the body type radio button to "raw", and change the format dropdown selector to "JSON (application/json)".
- Enter a JSON object containing the username and password in the Body textarea, e.g.
{ "username": "jason", "password": "my-super-secret-password" } - Click the "Send" button, you should receive a "200 OK" response with the user details including a JWT token in the response body, make a copy of this token because we'll be using it in the next step to make an authenticated request.
Here's a screenshot of Postman after the request is sent and the user is authenticated.
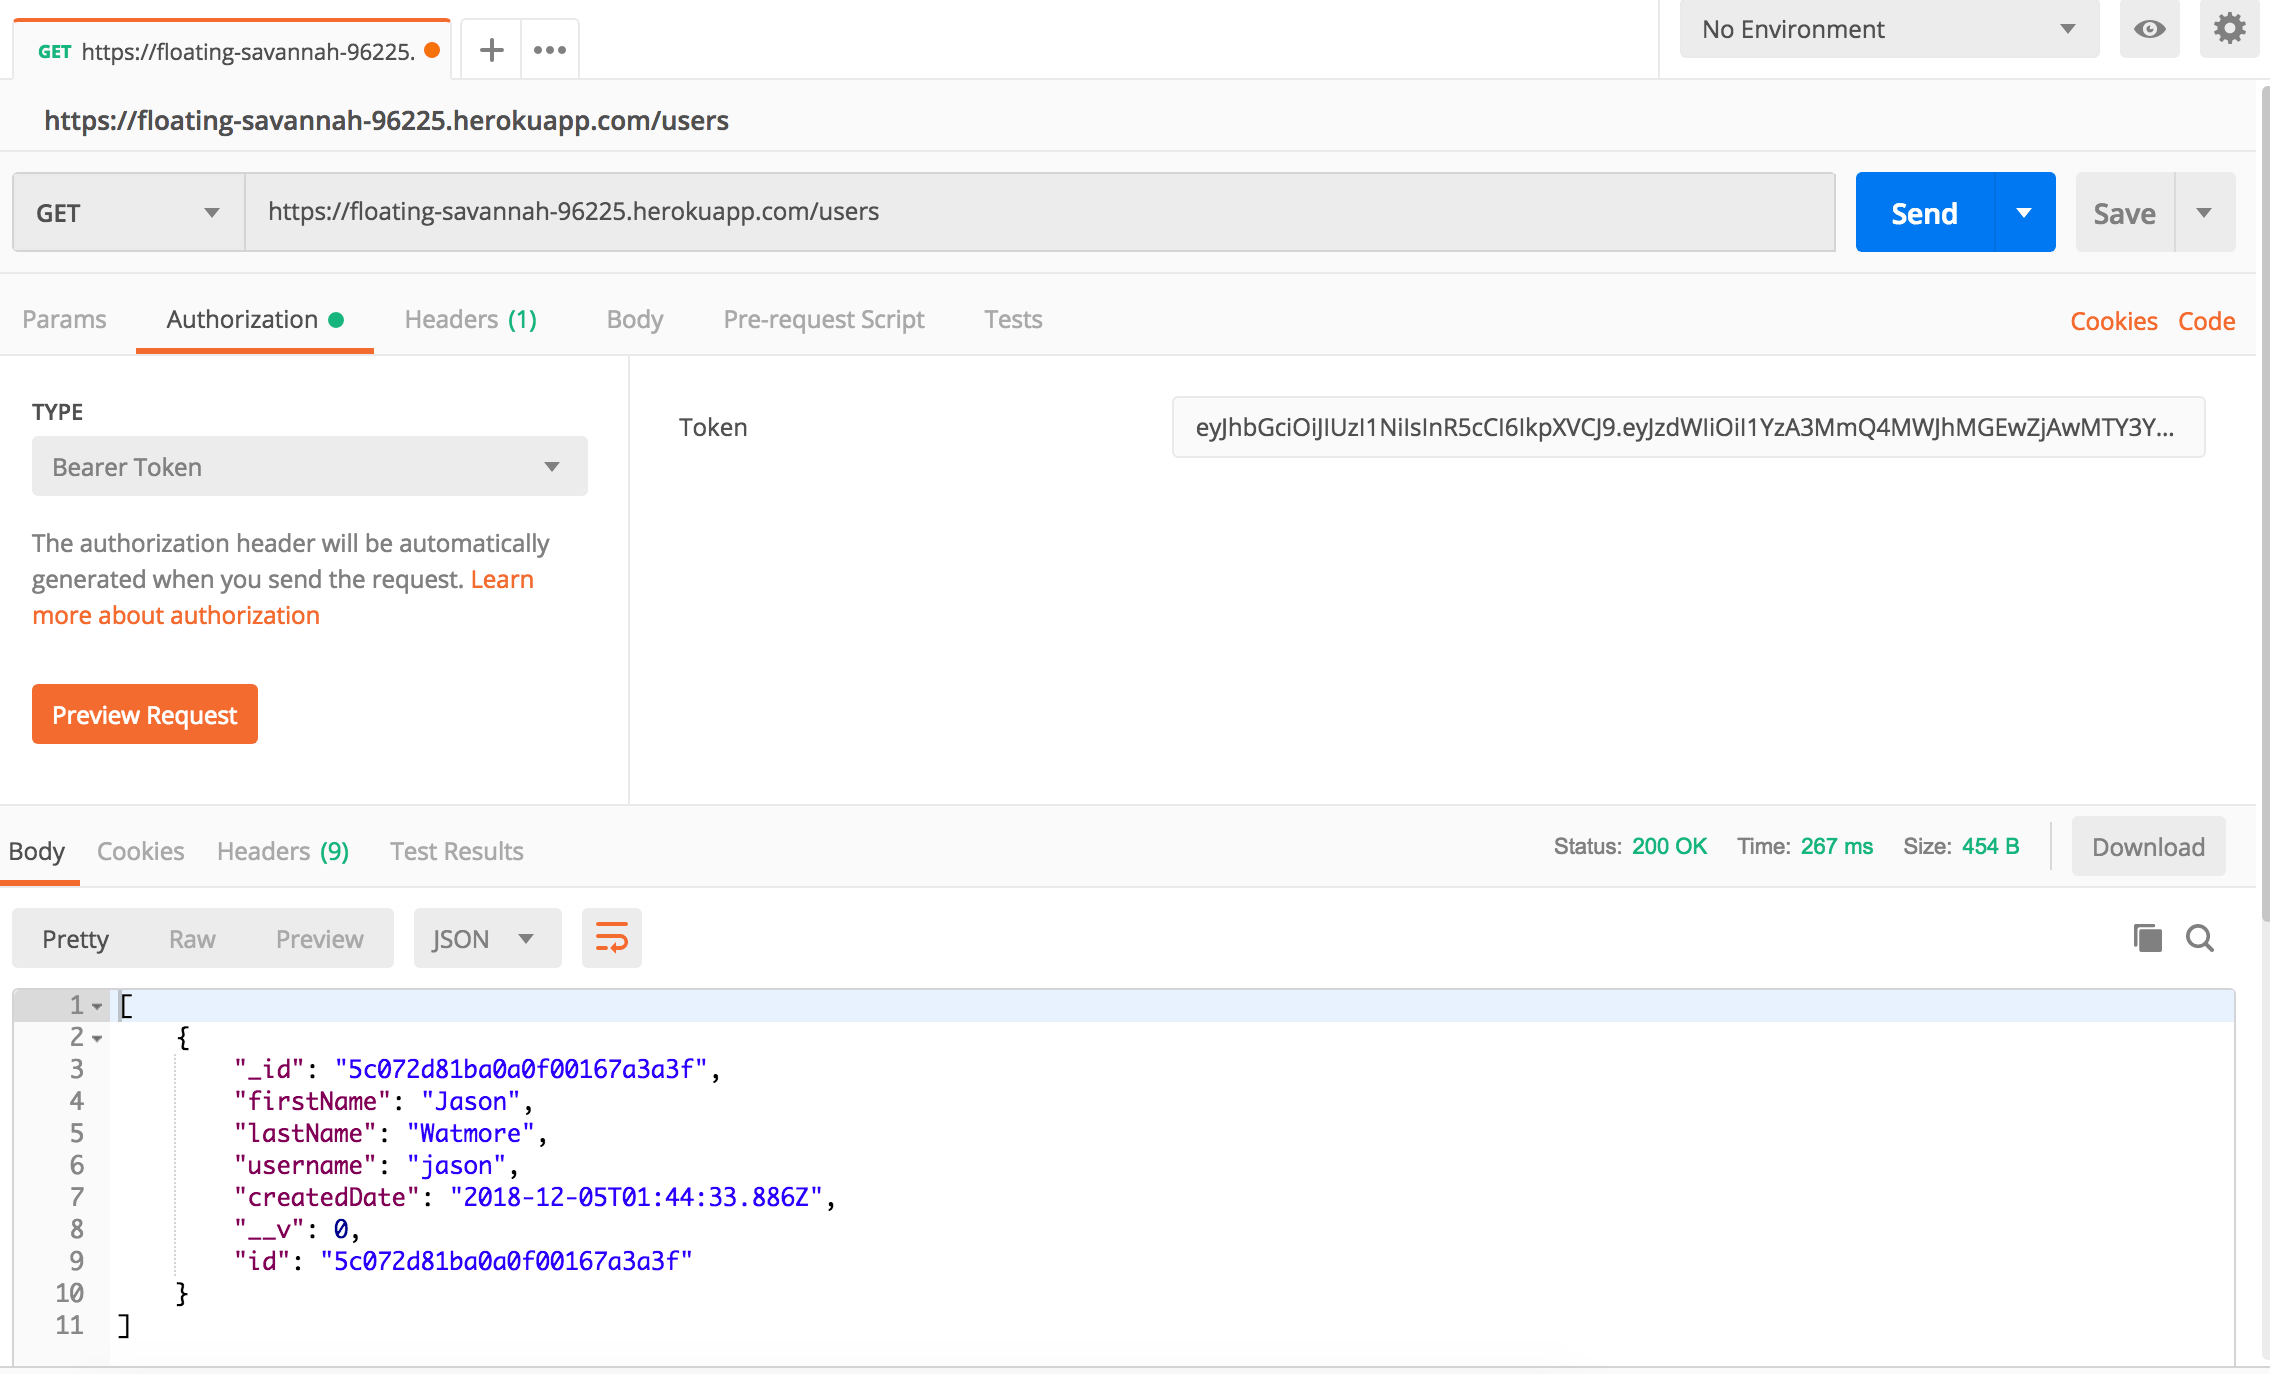
Make an authenticated request
To make an authenticated request using the JWT token from the previous step, follow these steps:
- Open a new request tab by clicking the plus (+) button at the end of the tabs.
- Change the http request method to "GET" with the dropdown selector on the left of the URL input field.
- In the URL field enter the address to your API on Heroku with the users path (
/users) added to the end, e.g.https://floating-savannah-96225.herokuapp.com/users. - Select the "Authorization" tab below the URL field, change the type to "Bearer Token" in the type dropdown selector, and paste the JWT token from the above authenticate step into the "Token" field.
- Click the "Send" button, you should receive a "200 OK" response containing a JSON array with all the user records in the system.
Here's a screenshot of Postman after making an authenticated request to get all users.
Need Some Heroku Help?
Search fiverr for freelance Heroku developers.
Follow me for updates
When I'm not coding...
Me and Tina are on a motorcycle adventure around Australia.
Come along for the ride!